Part 2: From Linux Namespaces to Kubernetes: Unpacking the CNI
April 08, 2026
In this part, we will walk through the Kubernetes networking model, dive deep into the CNI, and actually build our own CNI plugin to see how it works under the hood.
This is a long journey, so grab a cup of coffee and let's get started. But I promise you: by the end of this, you will have a solid understanding of how CNI works and look at cluster network issues in a completely different light.
Kubernetes Networking Model
To understand where CNI fits, it helps to look at the big picture. The Kubernetes Network Model is a set of principles that govern how everything in a cluster communicates. It consists of several key components:
- Pod Networking (Where CNI lives): The mechanism that actually wires up pods and ensures they can route traffic to one another across the cluster.
- Service API: The abstraction that stabilizes the chaos of ephemeral Pod IPs (handled under the hood by
kube-proxyandEndpointSlices). - Ingress / Gateway API: The front door that routes external client traffic into your cluster.
- Network Policies: The security rules that control traffic flow between pods and the outside world.
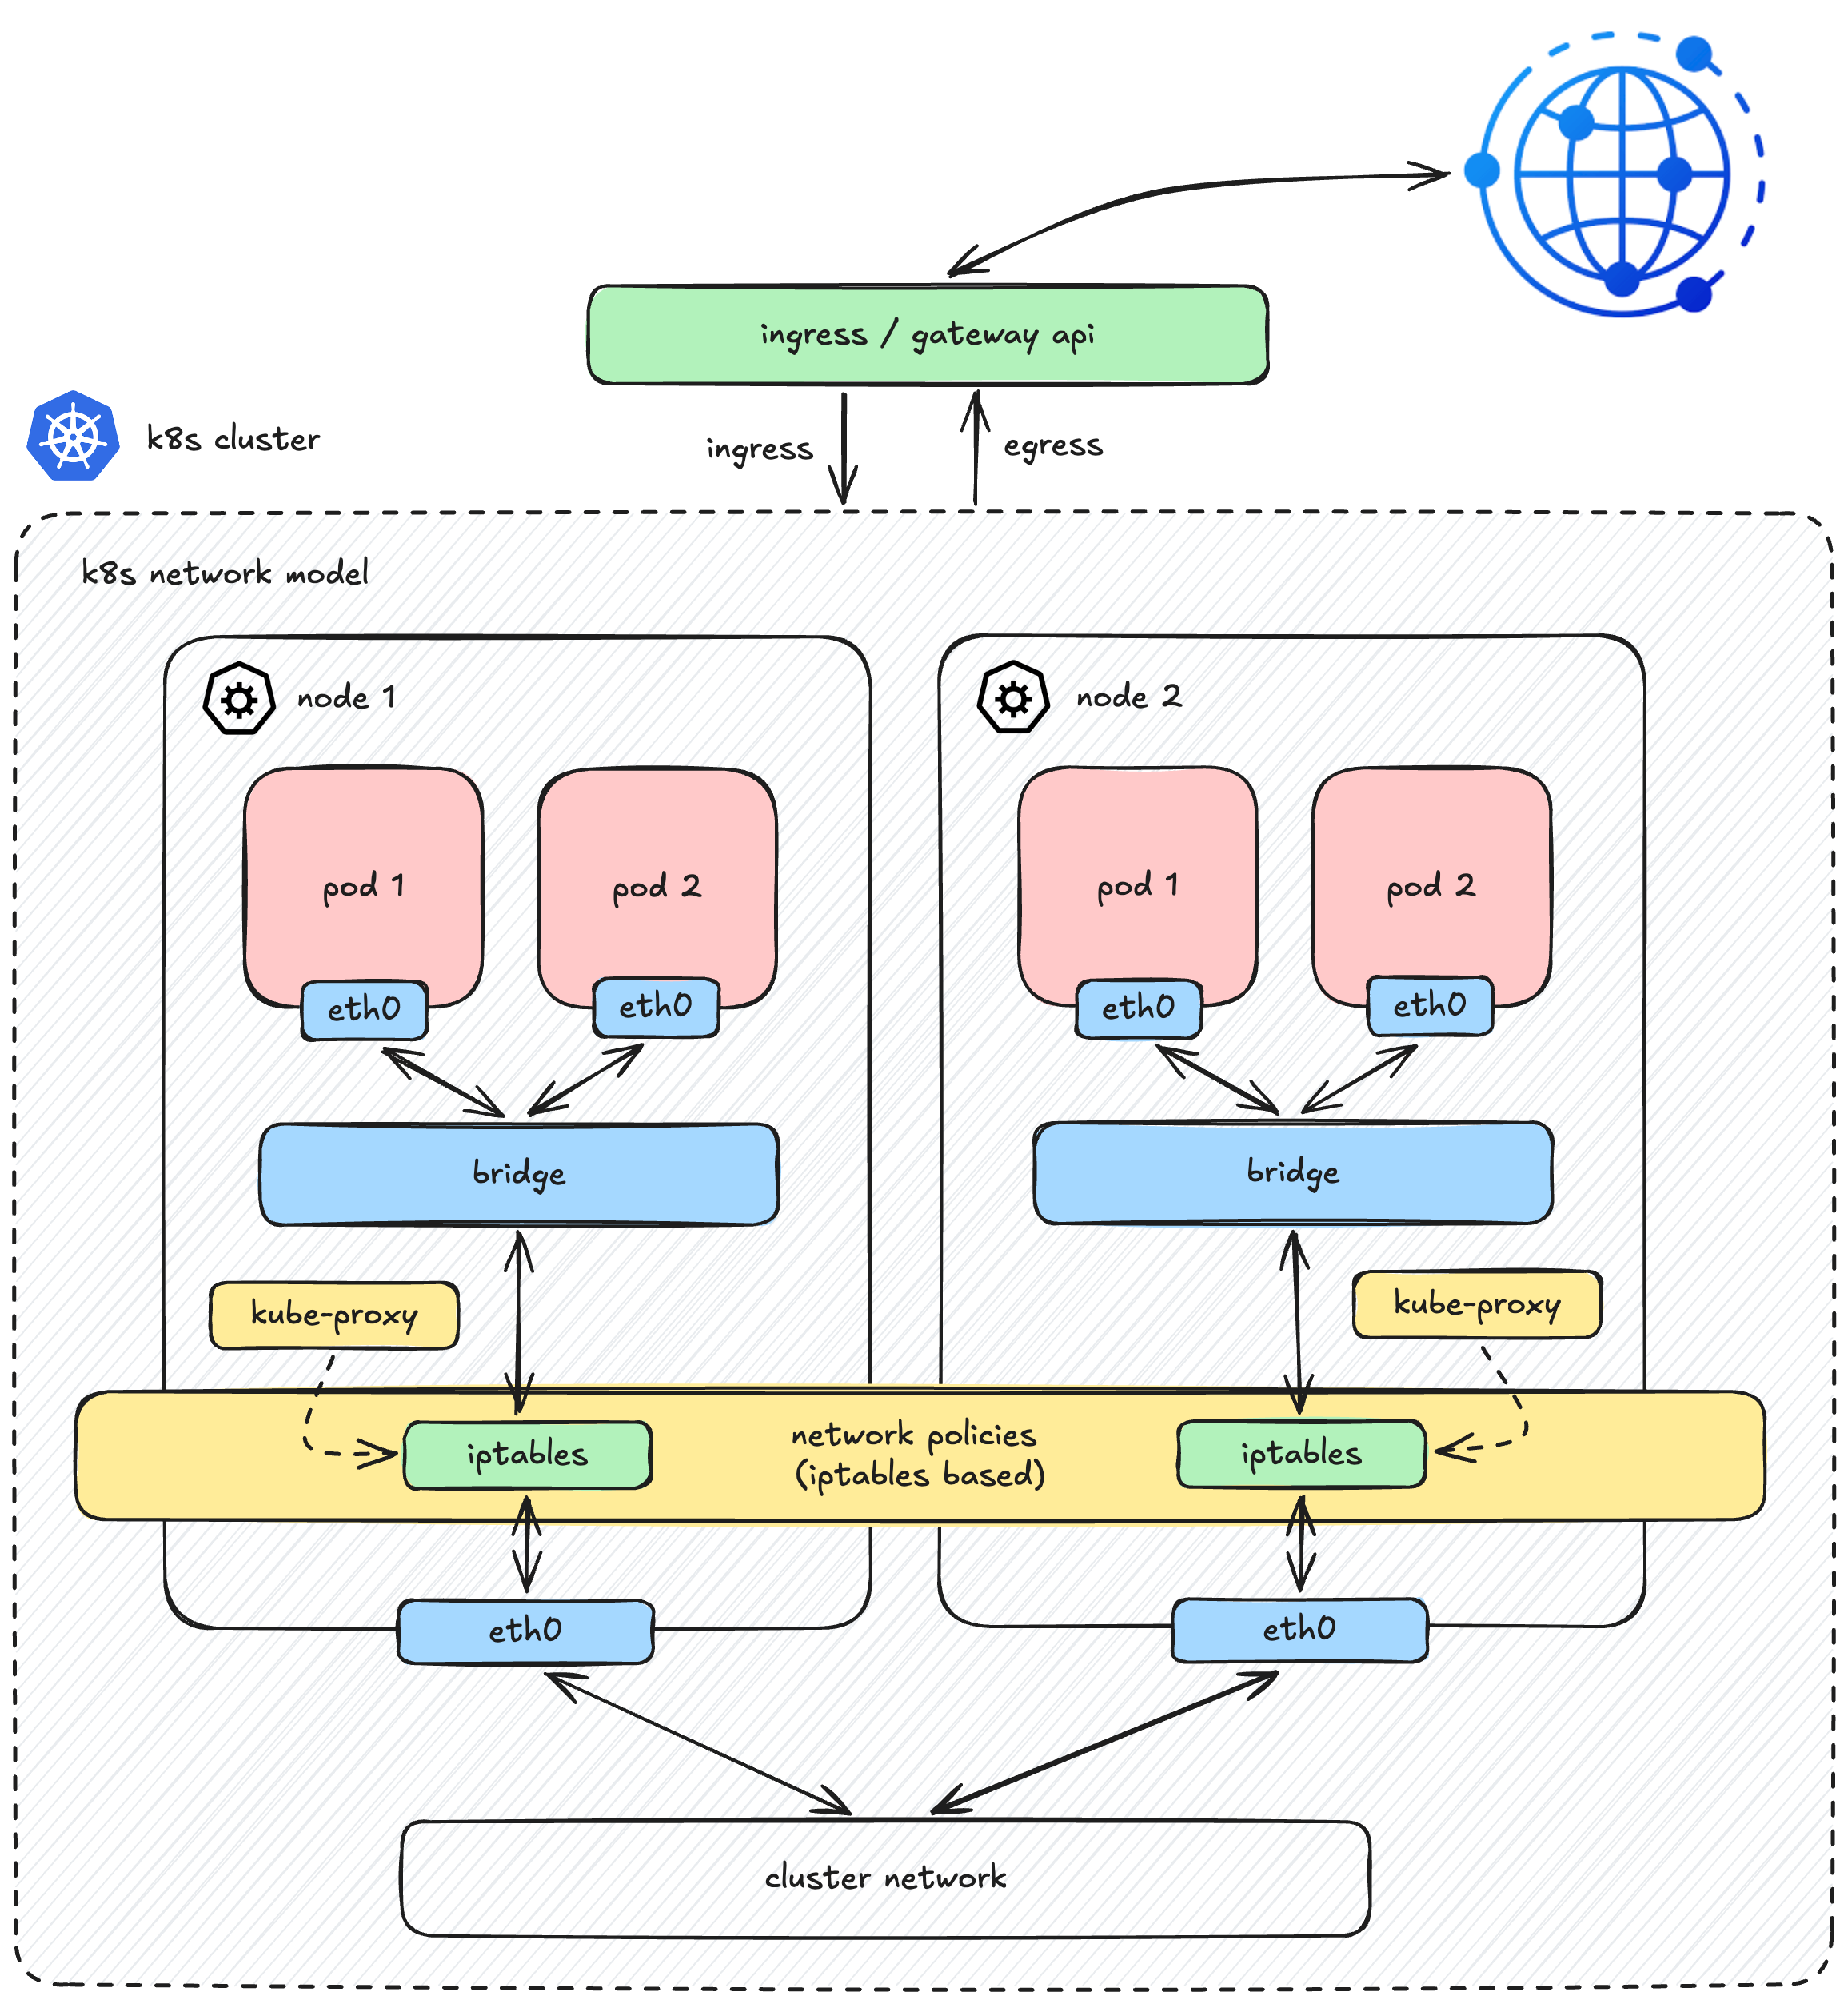
While Kubernetes provides robust API abstractions for all these layers, it heavily relies on external components for their actual implementations (such as Ingress controllers for Ingress, or CNI plugins for Network Policies). This is especially true for the foundational layer, Pod Networking which is completely decoupled from the core Kubernetes architecture.
Instead of dictating how the network should be built, Kubernetes simply establishes the rules of the game. According to the Kubernetes Network Model, any underlying network must satisfy these fundamental requirements:
- Shared Network Namespace: A pod has its own private network namespace, which is shared by all containers within that pod. Processes running in different containers inside the same pod can communicate with each other seamlessly over
localhost. - Direct Pod-to-Pod Communication: All pods can communicate with all other pods, whether they are on the same node or different nodes. This communication must happen directly, without the use of proxies or Network Address Translation (NAT).
To fulfill these requirements, Kubernetes delegates this massive responsibility to third-party plugins via the CNI (Container Network Interface) specification.
 (Caption: Muting the noise from upper layers to focus entirely on the foundational Pod Network)
With Services, Ingress, and Policies out of the way, let's dive deep into how this CNI engine actually works under the hood.
Can We Build Our Own CNI?
Absolutely. Getting our hands dirty and building things from scratch is exactly what we do here on the blog, right?
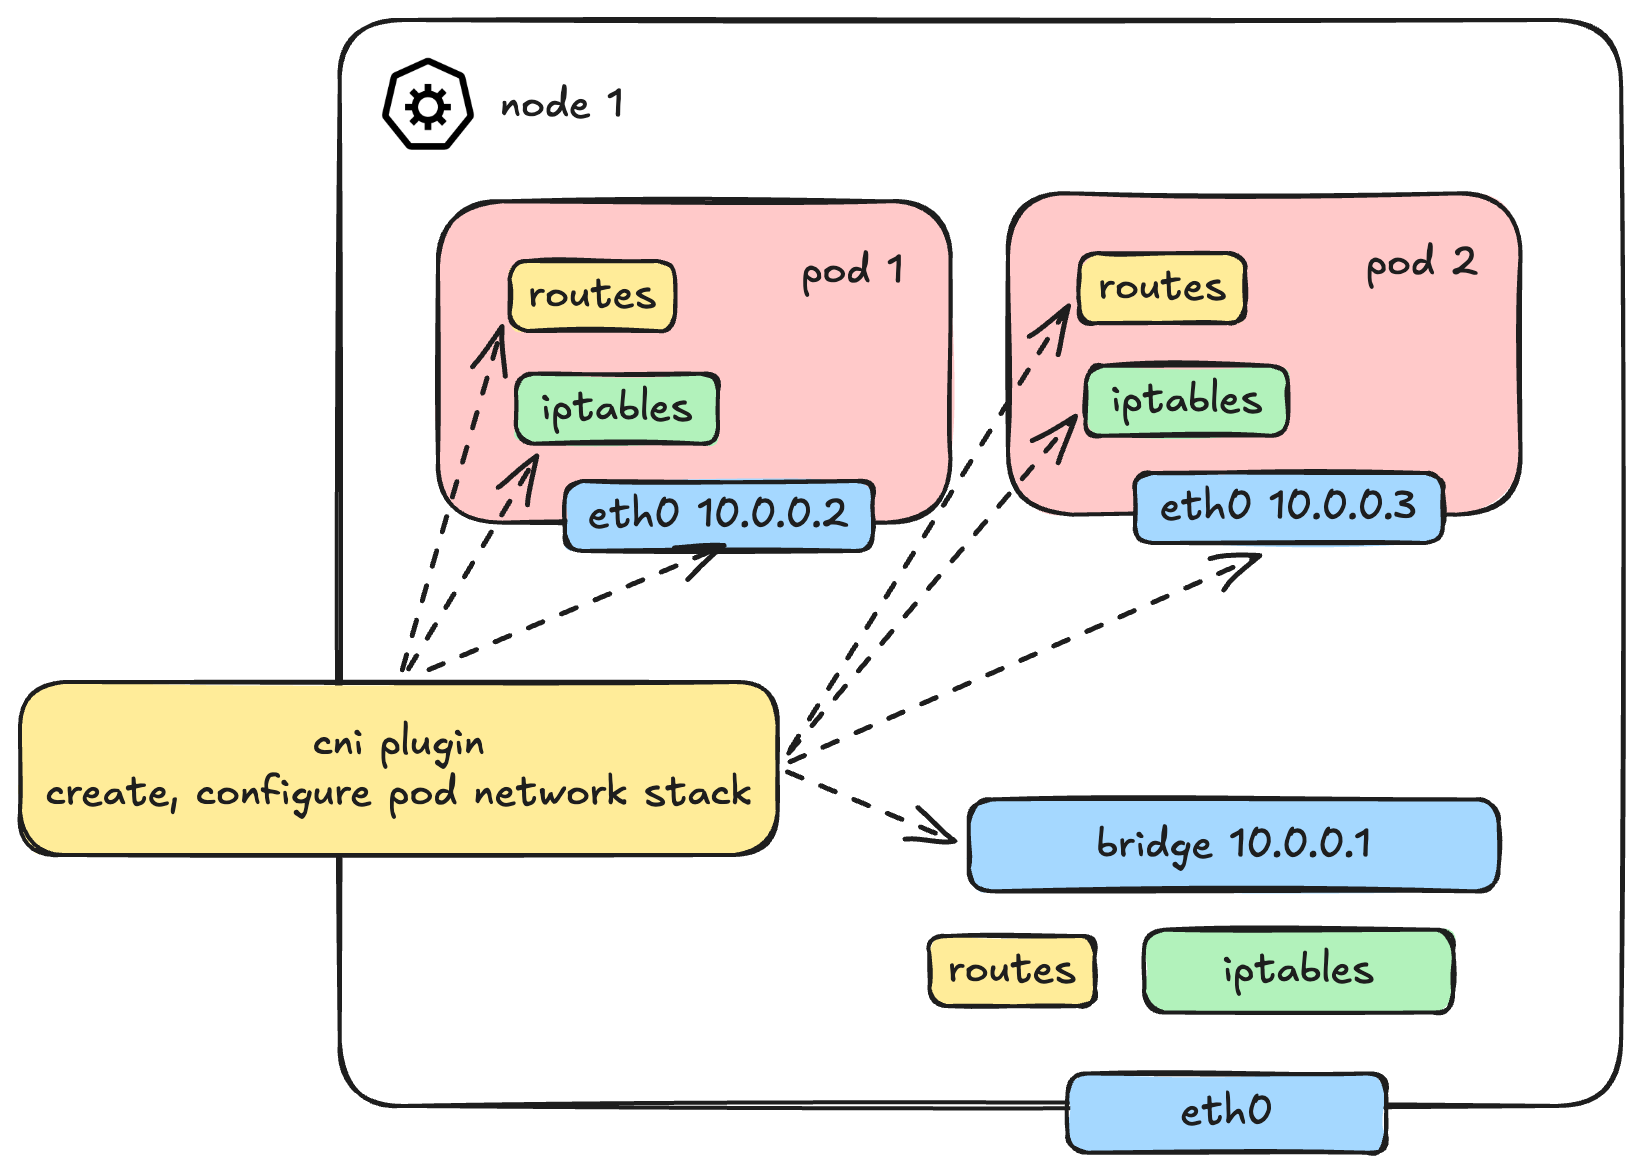
So, how do we solve the pod communication problem? In Part 1, we already learned how container networking is built from container-to-container, container-to-host, and out to the external world. While Pod is a Kubernetes-specific terminology, under the hood, it still heavily relies on the exact same containers and Linux networking primitives.
To fully wire up a network stack for a pod, several things need to be provisioned:
- Creating the Network Namespace (
netns) - Setting up Network Interfaces (like
vethpairs) - IP Allocation (IPAM)
- Configuring Routes
- Setting up iptables/Netfilter rules
Now, who does what? A common misconception is that Kubernetes does all of this. In reality, the workflow is highly decoupled. The kubelet doesn't even talk to the CNI directly. Instead, it delegates the job to the Container Runtime (via CRI).
Here is how the sequence actually looks under the hood:
- Kubelet asks the CRI (e.g., containerd) to create a Pod Sandbox.
- The CRI creates the Pod's Network Namespace.
- The CRI reads the CNI configuration file and executes the CNI binary.
- The CNI binary takes over to do the heavy lifting (creating veth pairs, assigning IPs, etc.) to connect the pod namespace to the host.
Visually, the architecture flows like this: 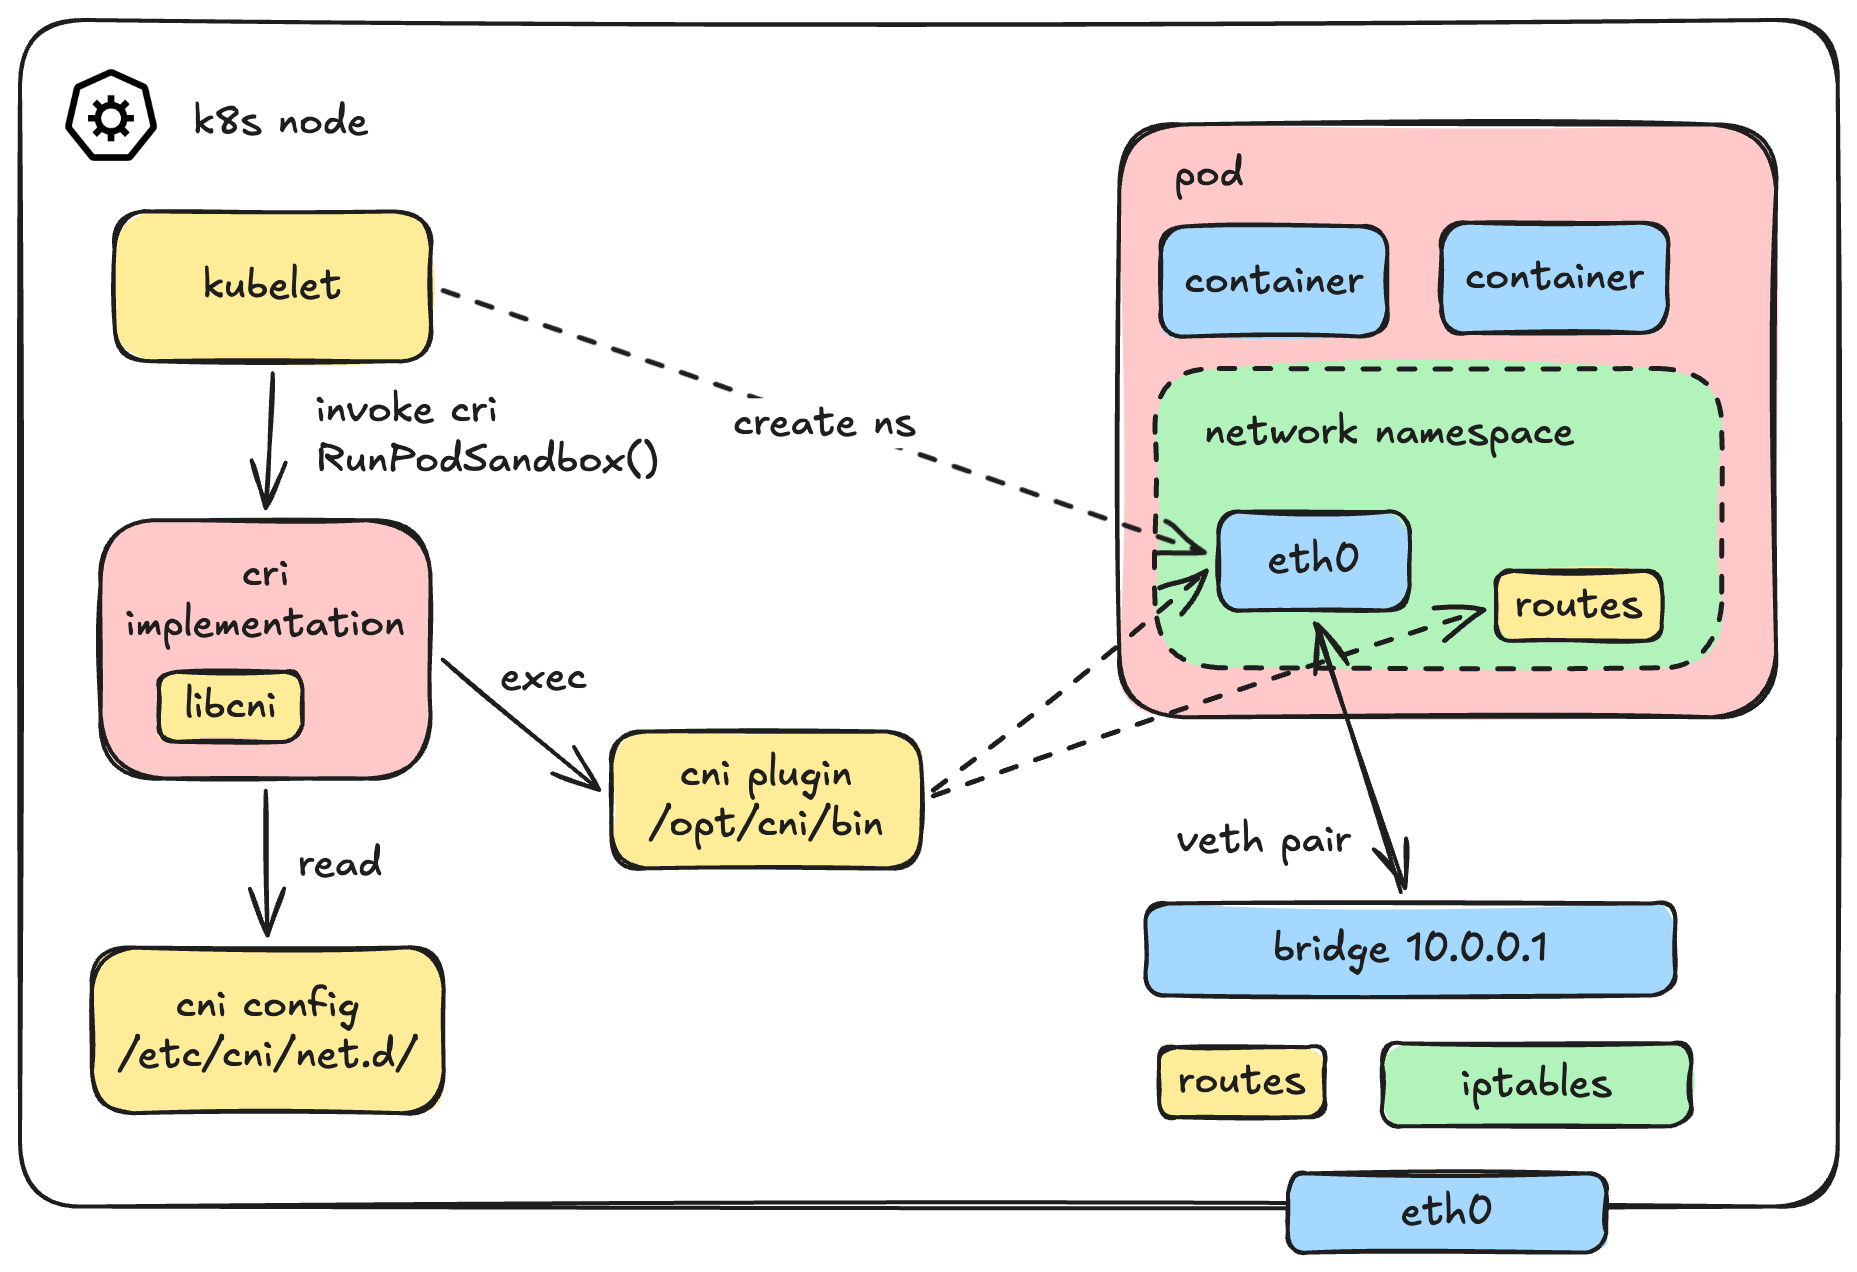
To give you a concrete mental model, here is the actual gRPC call from the Kubelet to the CRI when a pod is created:
// https://github.com/kubernetes/cri-api/blob/v0.33.1/pkg/apis/runtime/v1/api.proto#L40
rpc RunPodSandbox(RunPodSandboxRequest) returns (RunPodSandboxResponse) {}But since we are building a CNI, we aren't too interested in Kubelet's perspective. The real question is: How is the CNI plugin invoked by the CRI?
Is it a REST API? A Unix socket? gRPC?
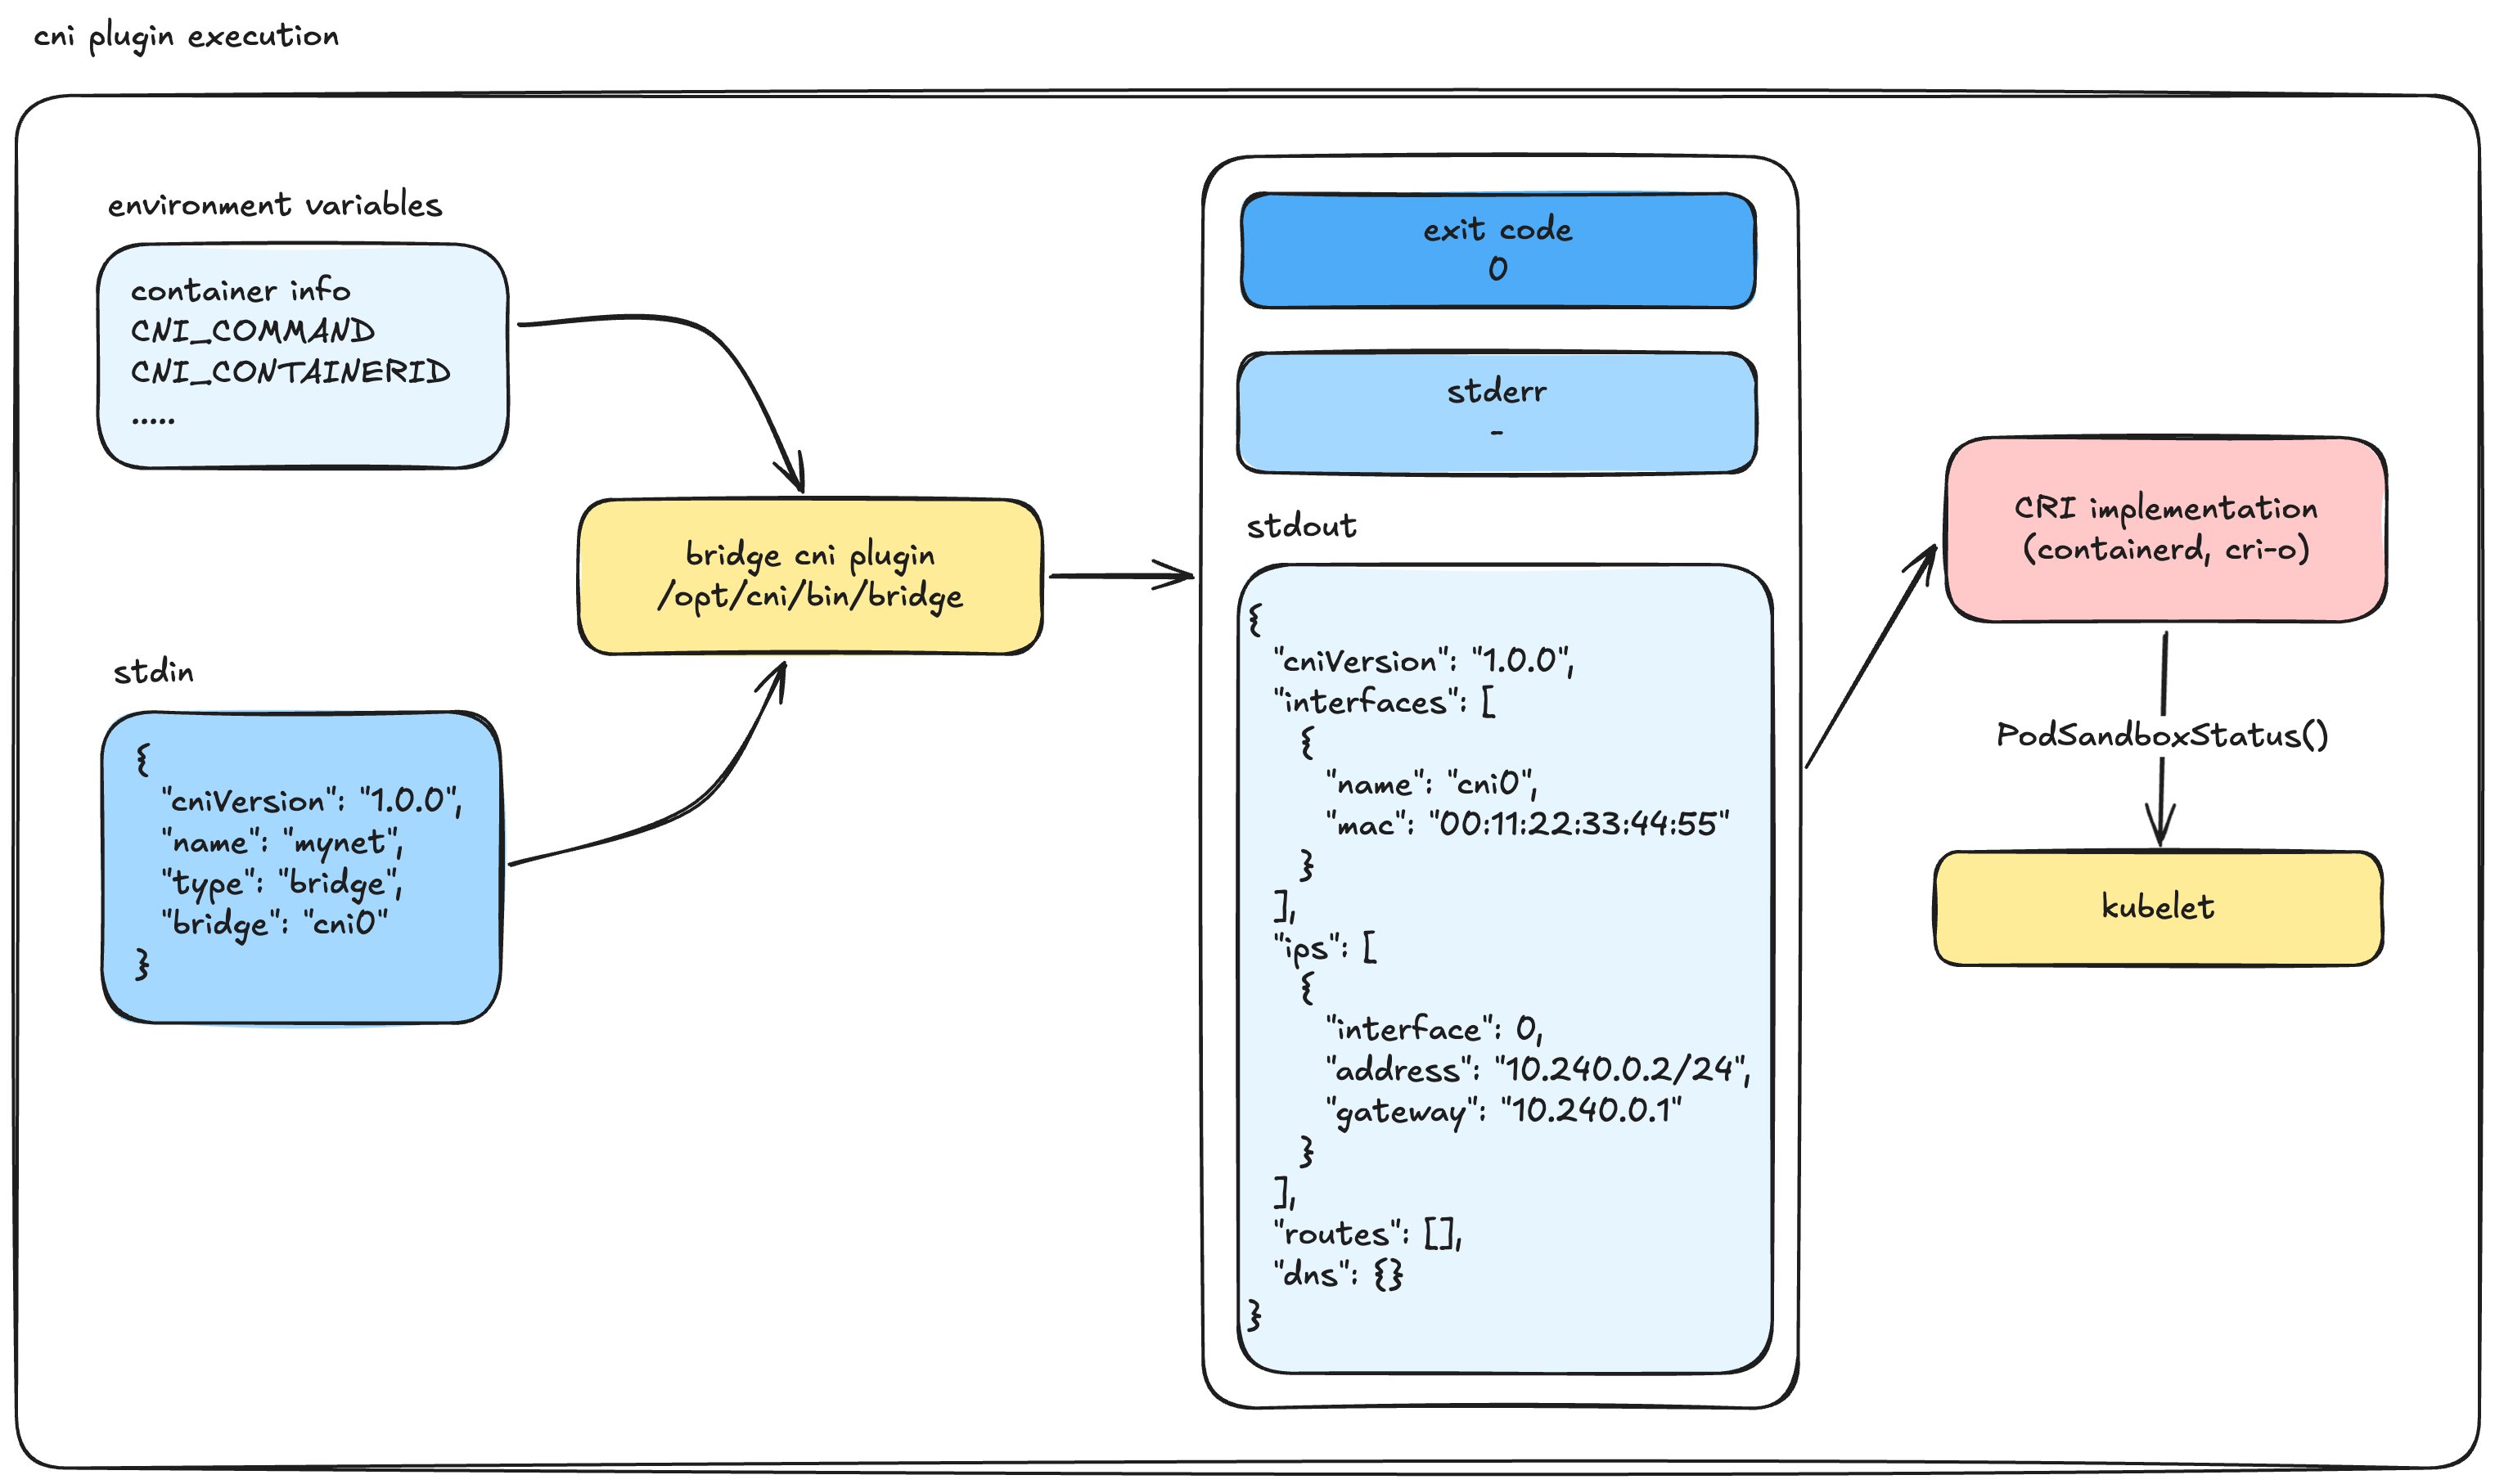
None of the above. A CNI plugin is not a running background service or a daemon. It is simply a "dead" executable binary sitting in /opt/cni/bin/.
Here is the exact sequence of how a container runtime (like containerd or CRI-O, using the libcni library) executes it:
- It looks for network configuration files in
/etc/cni/net.d/. (Fun fact: It picks the first file based on lexicographical/alphabetical sorting to use as the primary network, ignoring the rest). - These config files usually have a
.conflistor.confextension (do not use.jsonhere, it is not the standard convention for CNI). - It locates the corresponding CNI binary in
/opt/cni/bin/. - It executes the binary, passing context via Environment Variables and injecting the configuration file directly into Standard Input (stdin).
Visually, the execution flow looks like this: 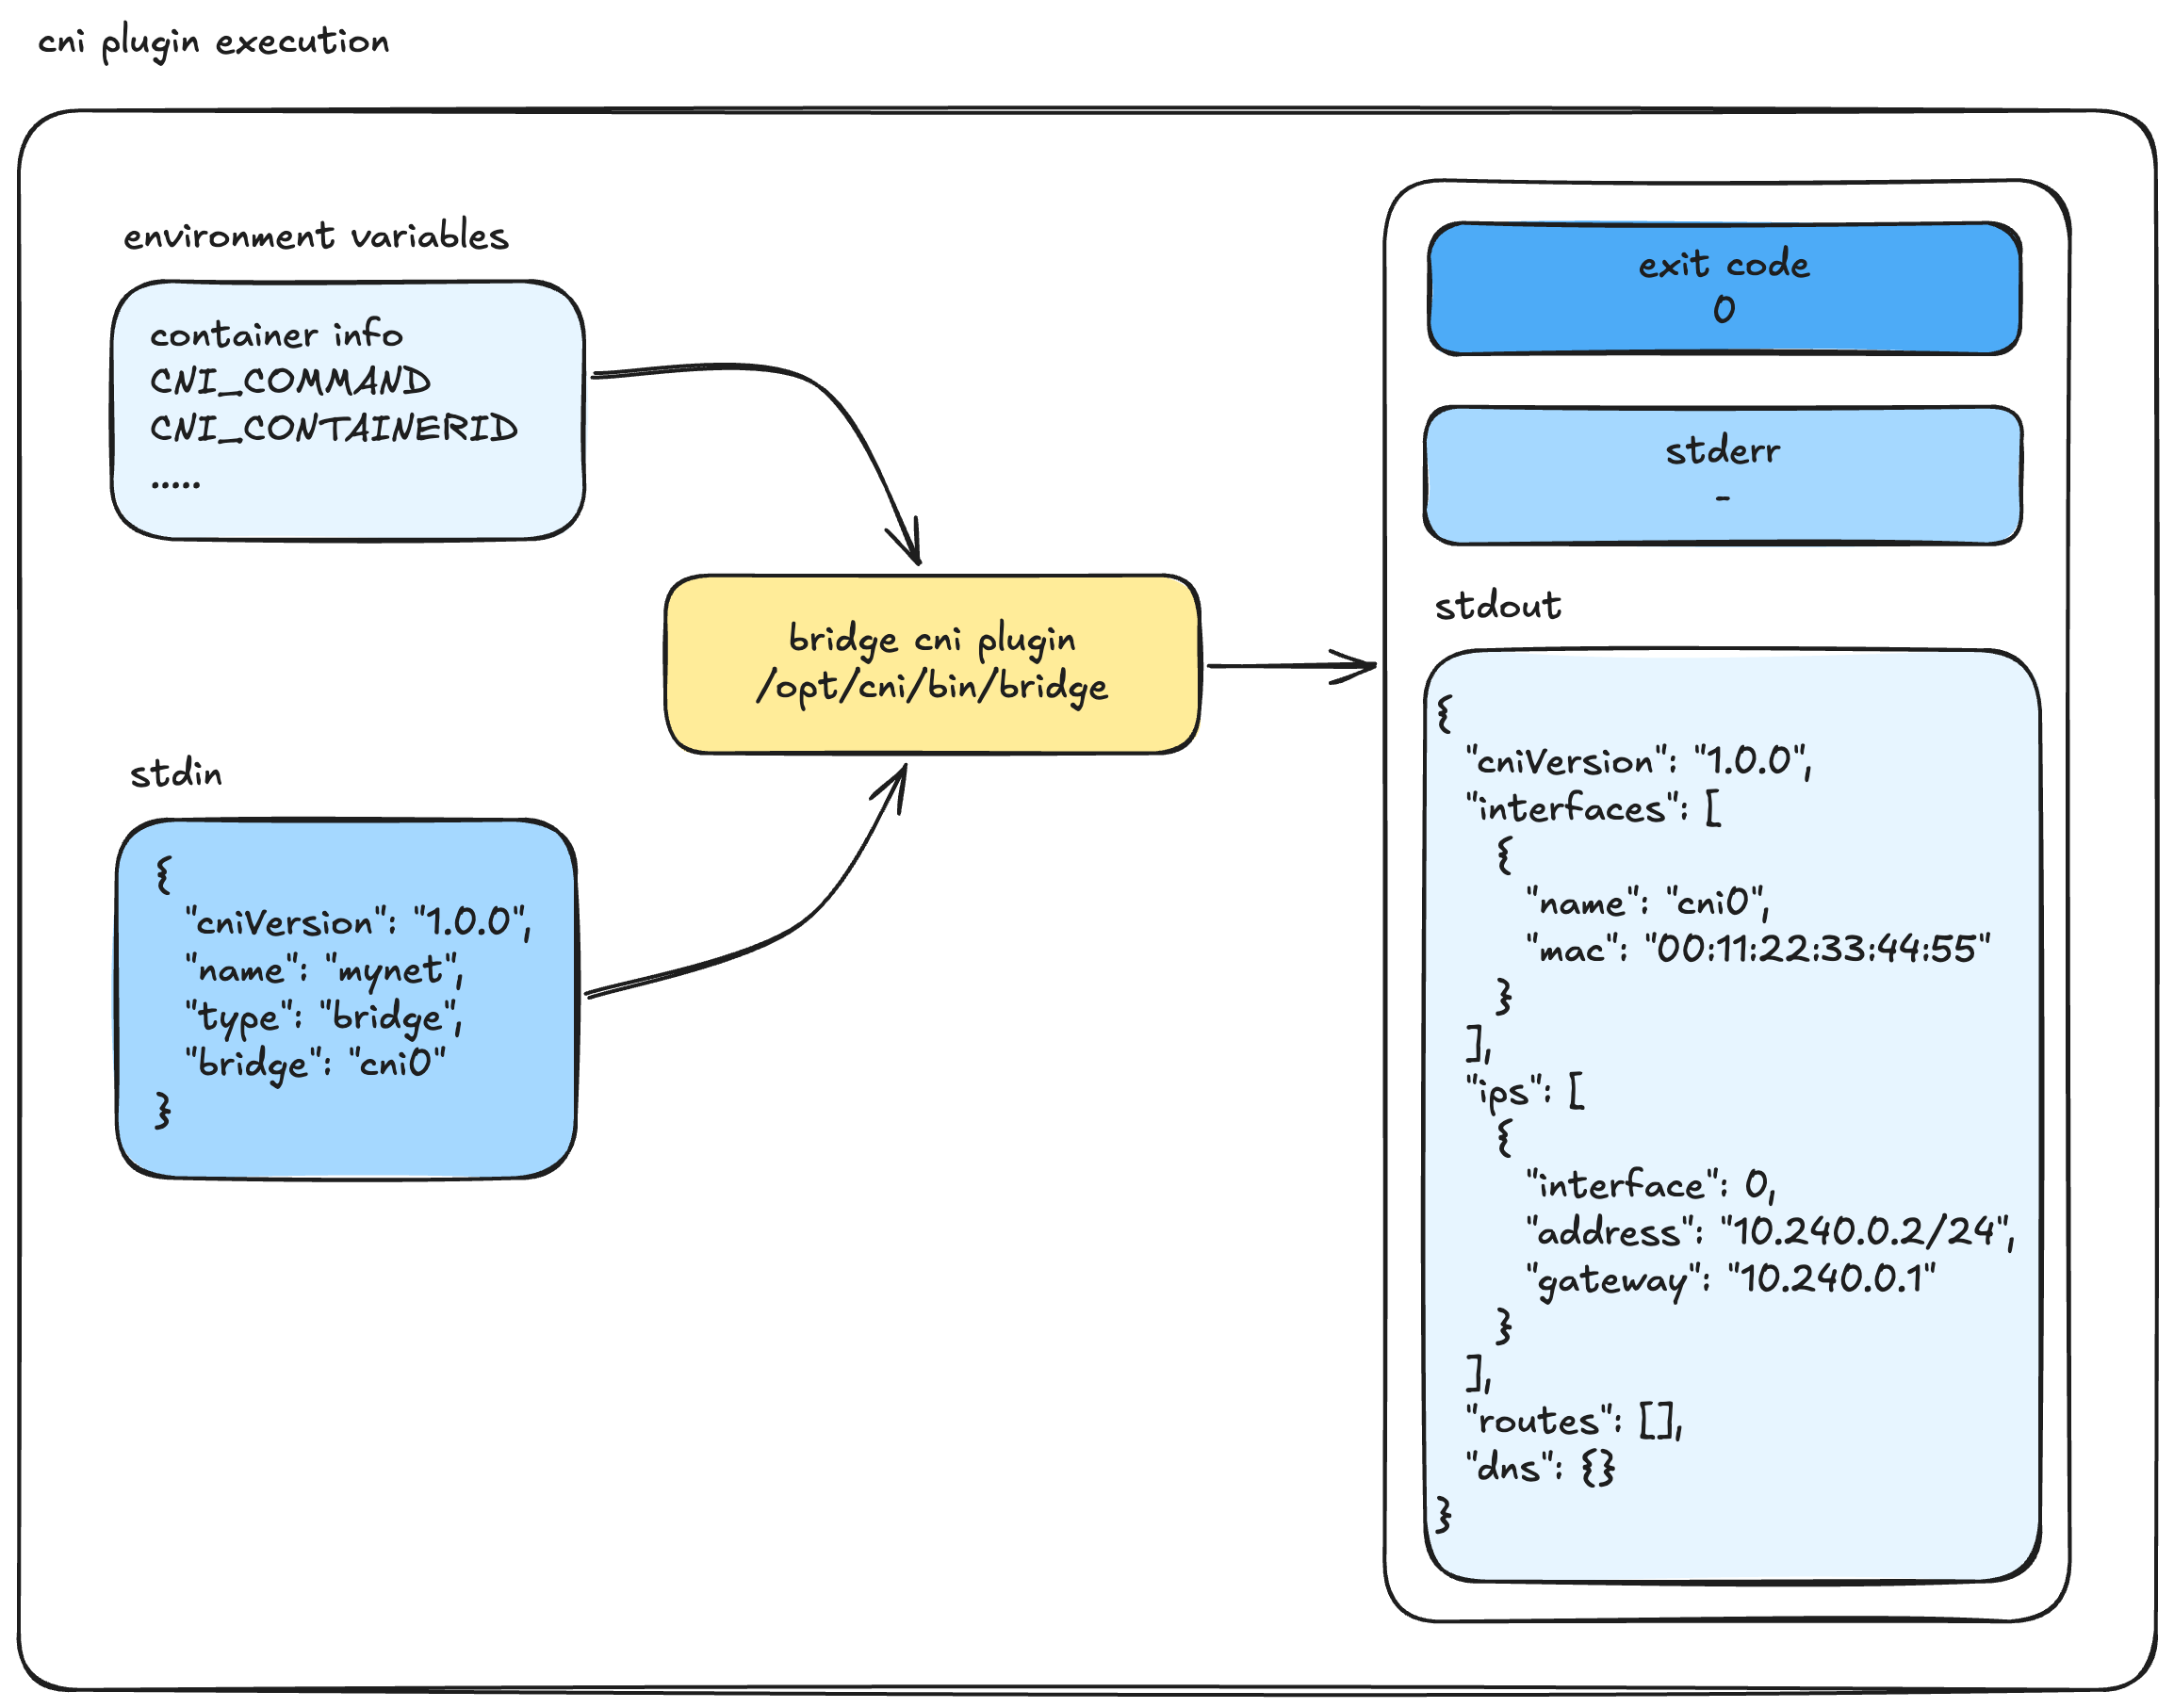
If we were to translate this CRI magic into plain Bash, it would look exactly like this:
# 1. containerd explicitly sets up the environment variables...
export CNI_COMMAND=ADD
export CNI_CONTAINERID=1234abcd5678
export CNI_NETNS=/var/run/netns/testing-ns
export CNI_IFNAME=eth0
export CNI_PATH=/opt/cni/bin

# 2. ...and executes the binary while piping the config file into stdin
cat /etc/cni/net.d/10-calico.conflist | /opt/cni/bin/calicoOnce the CNI binary finishes its job, it exits.
- If the execution is successful, the Exit Code is
0. Anything else means failure. - The runtime expects the result to be printed to
stdoutas a JSON object, while errors are sent tostderr.
A successful CNI ADD result returned to stdout looks like this valid CNI v1.0.0 JSON:
{
  "cniVersion": "1.0.0",
  "interfaces": [
    {
      "name": "cni0",
      "mac": "00:11:22:33:44:55"
    }
  ],
  "ips": [
    {
      "interface": 0, // Specifies the index in the interfaces array above
      "address": "10.240.0.2/24",
      "gateway": "10.240.0.1"
    }
  ]
}The CRI then takes this result and moves to the next step. If you are using a chained CNI setup (like bandwidth limiting or port mapping), it passes this output to the next plugin.
Finally, the CRI updates the Kubelet with the status of the Sandbox. If this whole CNI process fails, you will see a very familiar error in your Kubernetes cluster: NetworkPluginNotReady.
// https://github.com/kubernetes/cri-api/blob/v0.33.1/pkg/apis/runtime/v1/api.proto#L56
// PodSandboxStatus returns the status of the PodSandbox. If the PodSandbox is not
// present, returns an error.
rpc PodSandboxStatus(PodSandboxStatusRequest) returns (PodSandboxStatusResponse) {}Once the execution is completely successful, the pod is fully wired up. It has its own network interfaces, an allocated IP, routing rules, and iptables configured. It is finally ready for pod-to-pod communication.
Time to Build
Now we know exactly how the machinery works—how the CNI plugin is called, how it is configured, and the strict input/output contracts it must follow. There is no more magic left.
It's time to build our own CNI plugin.
Creating Our Own CNI Plugin
This architecture should look very familiar to you, right? We dug into this deeply in Part 1.
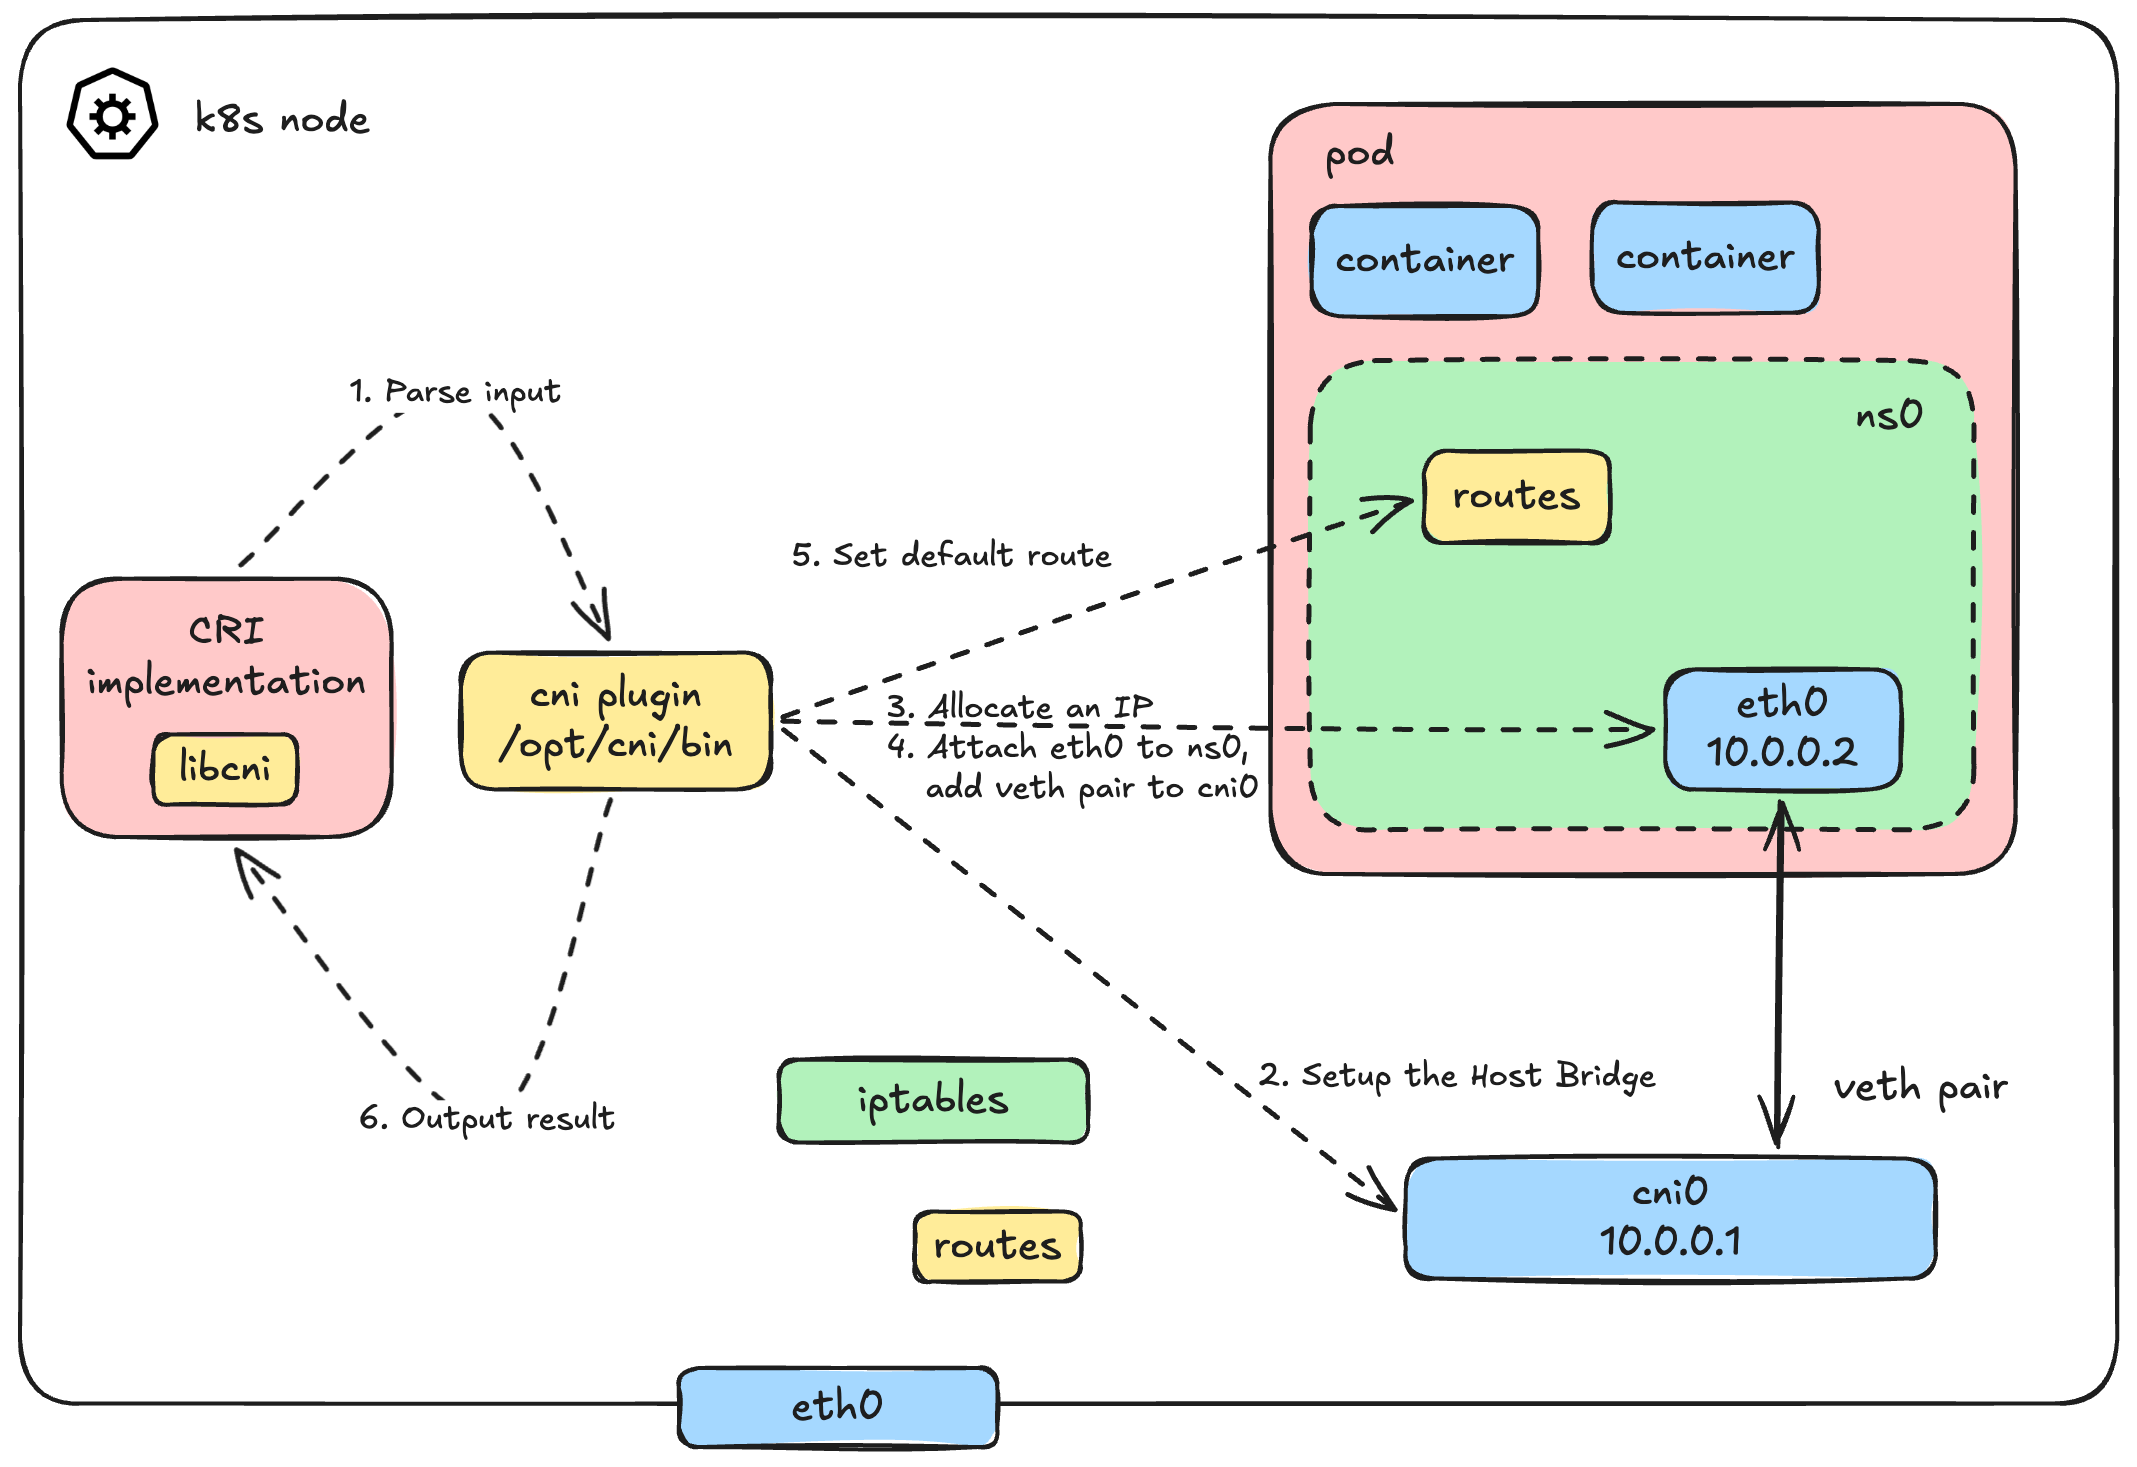
Basically, the logic of our CNI plugin will automate exactly what we did manually before. When the CRI calls our plugin with the ADD command, we need to:
- Parse the inputs: Read the JSON config from
stdinand the execution context from Environment Variables. - Setup the Host Bridge: Create a virtual bridge (let's call it
cni0) on the host if it doesn't exist, and assign it a gateway IP. - Allocate an IP (IPAM): Calculate and assign a unique IP address for the new pod.
- Wire up the Veth Pair: - Create a
vethpair.- Attach the host end (
veth$n) to thecni0bridge. - Move the container end to the pod's network namespace and rename it (usually to
eth0, passed via$CNI_IFNAME).
- Attach the host end (
- Configure the Pod Network: Bring the interface up, assign the allocated IP, and set the default route inside the pod.
- Return the Output: Format all these details into a strict JSON output and print it to
stdoutfor the CRI.
The catch? We are no longer configuring this interactively from our favorite terminal. We have to package it into an executable binary that tightly integrates with the CRI standard.
A Dead Simple CNI Plugin
Here is what the entire bash script looks like. It's a fully functional, albeit minimal, CNI plugin.
#!/bin/bash
log=/var/log/cni.log
config=$(cat /dev/stdin)

echo "---" >> $log
echo "COMMAND: $CNI_COMMAND" >> $log

case $CNI_COMMAND in
ADD)
    # 1. Parse config to get Pod CIDR
    podcidr=$(echo "$config" | jq -r ".podcidr")
    podcidr_gw=$(echo "$podcidr" | sed "s:0/24:1:g")

    # 2. Setup the host bridge (cni0)
    ip link add name cni0 type bridge 2>/dev/null || true
    ip link set cni0 up
    ip addr add "${podcidr_gw}/24" dev cni0 2>/dev/null || true

    # 3. Simple IPAM: Calculate next available IP
    if [ -f /tmp/last_allocated_ip ]; then
        n=$(cat /tmp/last_allocated_ip)
    else
        n=1
    fi
    n=$((n+1))
    ip=$(echo "$podcidr" | sed "s:0/24:$n:g")
    echo "$n" > /tmp/last_allocated_ip

    # 4. Create veth pair and attach to bridge
    host_ifname="veth$n"
    tmp_ifname="tmp$n"
    ip link add "$tmp_ifname" type veth peer name "$host_ifname"
    ip link set "$host_ifname" up
    ip link set "$host_ifname" master cni0

    # 5. Move interface to pod namespace, rename to eth0, and configure it
    # Extract namespace name for 'ip netns exec' compatibility
    nsname=$(basename "$CNI_NETNS")
    mkdir -p /var/run/netns/
    ln -sfT "$CNI_NETNS" "/var/run/netns/$nsname" 2>/dev/null || true

    ip link set "$tmp_ifname" netns "$nsname"
    ip netns exec "$nsname" ip link set "$tmp_ifname" name "$CNI_IFNAME"
    ip netns exec "$nsname" ip link set "$CNI_IFNAME" up
    ip netns exec "$nsname" ip addr add "$ip/24" dev "$CNI_IFNAME"
    ip netns exec "$nsname" ip route add default via "$podcidr_gw"

    # 6. Gather MAC address and generate JSON output for CRI
    mac=$(ip netns exec "$nsname" ip link show "$CNI_IFNAME" | awk '/ether/ {print $2}')
    address="${ip}/24"

    # CNI 1.0.0 output spec: removed 'version' field from ips array
    output_template='
{
  "cniVersion": "1.0.0",
  "interfaces": [
      {
          "name": "%s",
          "mac": "%s",
          "sandbox": "%s"
      }
  ],
  "ips": [
      {
          "address": "%s",
          "gateway": "%s",
          "interface": 0
      }
  ]
}'

    output=$(printf "${output_template}" "$CNI_IFNAME" "$mac" "$CNI_NETNS" "$address" "$podcidr_gw")
    echo "$output" >> $log

    # Print exactly to stdout for the CRI to read
    echo "$output"
;;

DEL)
    # Cleanup logic goes here
    # Remove the namespace symlink and let the kernel clean up the veth inside the netns
    rm -rf "/var/run/netns/$CNI_CONTAINERID"

    # Success in DEL must output nothing and exit 0
    exit 0
;;

CHECK)
    # Required in CNI 1.0.0.
    # CRI calls this to verify the container's network is still properly configured.
    # A full implementation would verify the interface, IP, and routes exist in $CNI_NETNS.
    # For a simple plugin, we log it and exit 0 (assuming healthy).
    echo "Checking network for container $CNI_CONTAINERID" >> $log
    exit 0
;;

VERSION)
    # CRI calls this to negotiate supported CNI versions
    echo '{
      "cniVersion": "1.0.0",
      "supportedVersions": [ "0.3.1", "0.4.0", "1.0.0" ]
    }'
;;

*)
    echo "Unknown CNI command: $CNI_COMMAND"
    exit 1
;;

esacThe Configuration File
We almost forgot the configuration file that gets scanned by CRI and fed into our script's stdin! Let's define it quickly.
We will place this in /etc/cni/net.d/10-my-cni-demo.conflist (or .conf). Keep it clean and valid JSON (no inline comments):
{
    "cniVersion": "1.0.0",
    "name": "my-cni-demo",
    "type": "my-cni-demo",
    "podcidr": "10.240.0.0/24"
}Remember, the type field must match the name of the binary in /opt/cni/bin/. Rename the script to my-cni-demo and move it to /opt/cni/bin/, make sure it execuable
chmod +x /opt/cni/bin/my-cni-demoLet's See It In Action
Time to take our plugin for a spin on a real Kubernetes cluster. We'll use kubeadm to bootstrap a minimal 2-node cluster:
| Node | Role | IP |
|---|---|---|
controlplane | Control Plane | 192.168.31.162 |
k8s-node01 | Worker | 192.168.31.163 |
Also, a quick heads-up: remember to install our dependency! It took me a while to figure out that I simply needed to install jq on the cluster nodes.
apt install jqAs for the prerequisites, I run my own Proxmox homelab with multiple nodes, so this was quite easy to set up. In my case, I'm using Debian as the base OS and a standard kubeadm setup with containerd. But if you don't have a dedicated lab, no worries, you can absolutely follow along using minikube or kind to create a local cluster. (Maybe in the future I'll write a guide on how to set up a Proxmox homelab and a k8s cluster from bare metal, cables and electricity)
Note for
minikube/kindusers: Both tools install a default CNI (likekindnet) out of the box. To build our custom CNI without conflict, you'll need to start your cluster with the default CNI disabled. Forkind, setdisableDefaultCNI: truein your cluster config. Forminikube, runminikube start --cni=false.
Nodes Not Ready - No CNI Installed
Right after bootstrapping, if you check the node status, you'll see something very familiar:
k get nodes -o wide
NAME           STATUS     ROLES           AGE    VERSION   INTERNAL-IP      EXTERNAL-IP   OS-IMAGE                         KERNEL-VERSION         CONTAINER-RUNTIME
controlplane   NotReady   control-plane   7d3h   v1.35.3   192.168.31.162   <none>        Debian GNU/Linux 12 (bookworm)   6.1.0-44-cloud-amd64   containerd://2.2.2
k8s-node01 NotReady <none> 7d3h v1.35.3 192.168.31.163 <none> Debian GNU/Linux 12 (bookworm) 6.1.0-44-cloud-amd64 containerd://2.2.2Both nodes are stuck in NotReady. The kubelet is reporting the exact error we predicted:
kubectl describe node controlplane

# Scroll to Conditions section
Conditions:
  Type                 Status  LastHeartbeatTime                 LastTransitionTime                Reason                       Message
  ----                 ------  -----------------                 ------------------                ------                       -------
KubeletNotReady container runtime network not ready: NetworkReady=false reason:NetworkPluginNotReady message:Network plugin returns error: cni plugin not initializedNo CNI plugin installed → no pod network → nodes can't become Ready. This is exactly how it should be.
Install Our CNI Plugin
Copy our my-cni-demo script and its configuration file to every node in the cluster:
# On each node:
# 1. Place the binary
cp my-cni-demo /opt/cni/bin/my-cni-demo
chmod +x /opt/cni/bin/my-cni-demo

# 2. Place the config (adjust podcidr per node)
# Master node: 10.240.1.0/24
# Worker node: 10.240.2.0/24
cat > /etc/cni/net.d/10-my-cni-demo.conf << 'EOF'
{
    "cniVersion": "1.0.0",
    "name": "my-cni-demo",
    "type": "my-cni-demo",
    "podcidr": "10.240.X.0/24"
}
EOFNote: Each node gets its own unique
podcidrto avoid IP conflicts across the cluster. In production CNIs like Calico or Cilium, this IPAM coordination happens automatically.
Nodes Should Be Ready
Within seconds, the kubelet detects the CNI configuration, re-evaluates the network readiness, and the nodes transition to Ready:
➜  ~ k get nodes -o wide

NAME           STATUS   ROLES           AGE    VERSION   INTERNAL-IP      EXTERNAL-IP   OS-IMAGE                         KERNEL-VERSION         CONTAINER-RUNTIME
controlplane   Ready    control-plane   7d3h   v1.35.3   192.168.31.162   <none>        Debian GNU/Linux 12 (bookworm)   6.1.0-44-cloud-amd64   containerd://2.2.2
k8s-node01 Ready <none> 7d3h v1.35.3 192.168.31.163 <none> Debian GNU/Linux 12 (bookworm) 6.1.0-44-cloud-amd64 containerd://2.2.2Our dead-simple bash script just passed Kubernetes' network readiness check. Not bad!
Notice something interesting: the node transitioned to Ready without a single pod being created. That's because the kubelet (via containerd) only needs to detect a valid CNI config file in /etc/cni/net.d/ and confirm the matching binary exists in /opt/cni/bin/. The CNI binary itself hasn't even been executed yet, it only runs when the CRI actually needs to wire up a pod's network (the ADD command).
Speaking of which, let's watch our plugin do its thing.
Nodes are done, let's deploy some pods
Let's deploy three pods to test different communication patterns:
| No. | Pod | Node | Taints |
|---|---|---|---|
| 1 | busybox | k8s-node01 | None |
| 2 | nginx1 | k8s-node01 | None |
| 3 | nginx2 | controlplane | node-role.kubernetes.io/control-plane:NoSchedule |
# Pod 1: busybox on k8s-node01 (our test client)
kubectl run busybox --image=busybox --overrides='{"spec":{"nodeSelector":{"kubernetes.io/hostname":"k8s-node01"}}}' -- sleep 3600

# Pod 2: nginx on k8s-node01 (same node as busybox)
kubectl run nginx1 --image=nginx --overrides='{"spec":{"nodeSelector":{"kubernetes.io/hostname":"k8s-node01"}}}'

# Pod 3: nginx on controlplane (different node)
kubectl run nginx2 --image=nginx --overrides='{"spec":{"nodeSelector":{"kubernetes.io/hostname":"controlplane"},"tolerations":[{"key":"node-role.kubernetes.io/control-plane","operator":"Exists","effect":"NoSchedule"}]}}'Let's check the status of the pods:
➜  ~ k get pods -o wide

NAME      READY   STATUS    RESTARTS   AGE   IP           NODE           NOMINATED NODE   READINESS GATES
busybox   1/1     Running   0          10s   10.240.2.2   k8s-node01     <none>           <none>
nginx1    1/1     Running   0          9s    10.240.2.3   k8s-node01     <none>           <none>
nginx2 1/1 Running 0 9s 10.240.1.2 controlplane <none> <none>All three pods are Running with IPs allocated from their respective node's podcidr. Our IPAM logic is working.
Troubleshooting Note:: In case the pod is
Pendingor inContainerCreatingstatus, check the node status and the cni logs. To bring this up I actually had to adjust my vm network settings as well, so it may not work 100% out of the box depending on your environment.
Now this is where our logs get interesting. Remember the log=/var/log/cni.log at the top of our script? Let's check it:
cat /var/log/cni.log

---
COMMAND: ADD

{
  "cniVersion": "1.0.0",
  "interfaces": [
      {
          "name": "eth0",
          "mac": "66:c6:2d:4b:b9:18",
          "sandbox": "/var/run/netns/cni-3e744c89-da6a-f0be-06c6-367cc9616946"
      }
  ],
  "ips": [
      {
          "address": "10.240.1.2/24",
          "gateway": "10.240.1.1",
          "interface": 0
      }
  ]
}Each ADD entry is one pod being wired up by the CRI. You can see the exact JSON output our script returned, the same structure we defined earlier in the CNI spec section. The CRI consumed this output, confirmed the sandbox was ready, and reported back to the kubelet. Full circle.
Intra-node communication
busybox → nginx1 (both on k8s-node01):
kubectl exec busybox -- wget -qO- http://10.240.2.3

# wget: can't connect to remote host (10.240.2.3): Connection refused
# command terminated with exit code 1That's odd. Both pods are on the same node, wired to the same cni0 bridge. This should be pure L2 switching, no routing involved. So why the failure?
Diagnosing the failure
First, let's rule out an L2/L3 issue and check if basic ICMP even works:
kubectl exec busybox -- ping -c3 10.240.2.3

# PING 10.240.2.3 (10.240.2.3): 56 data bytes
# ping: sendto: Network unreachablePing fails too, this isn't a TCP-only issue. All traffic to the pod is being blocked at the network level. Let's dig into the host:
# Check ip_forward on the worker node
cat /proc/sys/net/ipv4/ip_forward
# 1

# Inspect the FORWARD chain
iptables -L FORWARD --line-numbers
# Chain FORWARD (policy ACCEPT)
# num target prot opt source destinationThere's the problem:
No ACCEPT rule for our pod CIDR - nothing in the chain allows traffic to or from 10.240.2.0/24.
Fix: Add FORWARD rules for the pod CIDR
The fix is straightforward, explicitly tell iptables to ACCEPT traffic from and to our pod CIDR:
# On the worker node
iptables -A FORWARD -s 10.240.0.0/16 -j ACCEPT
iptables -A FORWARD -d 10.240.0.0/16 -j ACCEPTNow let's try again with wget:
kubectl exec busybox -- wget -qO- http://10.240.2.3# <!DOCTYPE html>
# <html>
# <head>
# <title>Welcome to nginx!</title>
# ...Boom, it works! But as you already know, pods on the same node communicate through the shared cni0 bridge. This is purely Layer 2 switching, exactly like the bridge networking we built in Part 1.
Cross-Node Communication
Now that intra-node communication is sorted, what about talking to a pod on a completely different node? Let's test the connection from our busybox pod on k8s-node01 to the nginx2 pod sitting on our controlplane node:
busybox (k8s-node01) → nginx2 (controlplane):
kubectl exec busybox -- wget -qO- --timeout=3 http://10.240.1.2
# wget: download timed outDiagnosing the Failure
Let's think about the journey of this packet. Traffic leaves the busybox pod, hits the cni0 bridge on k8s-node01, and then... where does it go?
To find out, we need to inspect the routing table on our k8s-node01 worker node:
root@k8s-node01:~# ip route
# default via 192.168.31.1 dev eth0 proto static
# 10.240.2.0/24 dev cni0 proto kernel scope link src 10.240.2.1
# 192.168.31.0/24 dev eth0 proto kernel scope link src 192.168.31.163Here lies the problem: there is absolutely no route pointing to 10.240.1.0/24 (the pod CIDR for the controlplane node). The worker node simply doesn't know where to send packets destined for that network. Consequently, they get sent out the default route (likely to your physical gateway), which dutifully drops them because it has no idea what a 10.240.1.x address is either.
If we check the controlplane node, we'll see the exact same issue in reverse:
root@controlplane:~# ip route
# default via 192.168.31.1 dev eth0 proto static
# 10.240.1.0/24 dev cni0 proto kernel scope link src 10.240.1.1
# 192.168.31.0/24 dev eth0 proto kernel scope link src 192.168.31.162The control plane node knows about its own pods (10.240.1.0/24), but it is completely oblivious to the worker node's pods (10.240.2.0/24).
Fix: Adding Static Routes
To fix this, we need to teach each node how to reach the other node's pod CIDR. We do this by adding simple static routes, telling each host to use the other host's physical IP address as the gateway for its respective pod network.
# On k8s-node01: Route controlplane's pod CIDR through the controlplane's primary IP
root@k8s-node01:~# ip route add 10.240.1.0/24 via 192.168.31.162 dev eth0# On controlplane: Route worker node's pod CIDR through the worker node's primary IP
root@controlplane:~# ip route add 10.240.2.0/24 via 192.168.31.163 dev eth0Note: In a real-world scenario with hundreds of nodes, managing static routes manually is impossible. Production CNIs handle this dynamically using routing protocols like BGP (as in Calico) or by tunneling traffic via overlay networks like VXLAN (as in Flannel or Cilium). But underneath all that magic, the goal is exactly the same: ensuring nodes know how to route traffic to remote pod CIDRs.
Let's try our cross-node request again:
kubectl exec busybox -- wget -qO- --timeout=3 http://10.240.1.2
# <!DOCTYPE html>
# <html>
# <head>
# <title>Welcome to nginx!</title>
# ...Success! Cross-node pod-to-pod communication is officially functioning. We have successfully satisfied the core requirements of the Kubernetes Network Model.
Pods to the Internet (Outbound Connectivity)
Our pods can talk to each other, but can they reach the outside world? Let's trace a ping to Google's public DNS from our busybox pod:
kubectl exec busybox -- ping -w3 8.8.8.8
# PING 8.8.8.8 (8.8.8.8): 56 data bytes

# --- 8.8.8.8 ping statistics ---
# 3 packets transmitted, 0 packets received, 100% packet lossIt doesn't work. If you remember our deep dive in Part 1, you probably already know exactly why this is failing.
The ICMP echo request successfully leaves the node, hits your home router, and travels all the way to Google's servers. However, when Google tries to reply, it sees the source IP of the packet: 10.240.2.2 (our pod's private IP). Since this is an unroutable private IP address, the response packet is dropped on the floor somewhere on the public internet. It never makes it back.
To fix this, we need to implement Source NAT (SNAT), also known as IP Masquerading.
Fix: Add SNAT Masquerading Rules
We need to configure iptables to temporarily replace the pod's private IP with the node's physical IP address right before the packet leaves the host.
On k8s-node01
# Tell the node: If traffic from our pod CIDR is departing, and it's NOT destined for the local cni0 bridge, masquerade it!
root@k8s-node01:~# iptables -t nat -A POSTROUTING -s 10.240.2.0/16 ! -o cni0 -j MASQUERADEOn controlplane
# Do the exact same on the controlplane node for its respective CIDR
root@controlplane:~# iptables -t nat -A POSTROUTING -s 10.240.1.0/16 ! -o cni0 -j MASQUERADELet's test it again from the worker node:
kubectl exec busybox -- ping -c2 8.8.8.8
# PING 8.8.8.8 (8.8.8.8): 56 data bytes
# 64 bytes from 8.8.8.8: seq=0 ttl=112 time=55.339 ms
# 64 bytes from 8.8.8.8: seq=1 ttl=112 time=55.173 msAnd just to be thorough, let's test internet connectivity from the control plane node as well:
kubectl exec nginx2 -- curl -s -I 1.1.1.1 | grep HTTP
HTTP/1.1 301 Moved PermanentlyBoth pods can successfully reach the internet!
Summary
Pod networking and the CNI might initially seem like an impenetrable black box, but when you strip away the abstraction layers, there's no magic involved.
We demystified the entire process. The CNI is simply a standardized interface, a contract that allows the kubelet, the CRI, and third-party network plugins to communicate predictably. It provides a structured way to automate the provisioning of pod networks. But beneath the surface, it relies entirely on the same fundamental Linux networking primitives - network namespaces, veth pairs, bridges, route tables, and iptables that we explored manually in Part 1.
Wrapping Up
First off, thank you for taking the time to read this far. I really appreciate it!
In this post, we covered a massive amount of ground:
- We examined the big-picture view of the Kubernetes Network Model.
- We explored how the CRI parses configurations and executes CNI plugins.
- We built our own functional, zero-dependency bash CNI plugin from scratch.
- We debugged and resolved both intra-node and cross-node communication failures using fundamental Linux commands.
- We implemented NAT masquerading to grant our pods outbound internet access.
I hope this journey from the low layers of Linux networking up to the Kubernetes CNI has given you a solid, intuitive understanding of what happens when you type kubectl run. The next time you encounter a NetworkPluginNotReady error or a strange routing issue in your cluster, you'll know exactly where to look.
What's Next?
I haven't quite decided yet! This post is getting pretty lengthy as it is. I originally planned to dive into some production-grade CNI plugins right here, but that quickly felt like a recipe for putting you to sleep halfway through reading.
So, we'll save that for another time. Stay tuned, I will definitely be exploring tools like Calico or Cilium in a future post.