Container Networking Under the Hood - Part 1: Building Container Networks from Scratch
March 27, 2026
Containers aren't magic, they're just Linux kernel features stitched together. In this article, we'll build a complete container network from scratch using nothing but raw Linux primitives: namespaces, veth pairs, bridges, and iptables. By the end, you'll deeply understand all 3 Docker network modes, because you'll have created them yourself.
Introduction: What are Linux Namespaces?
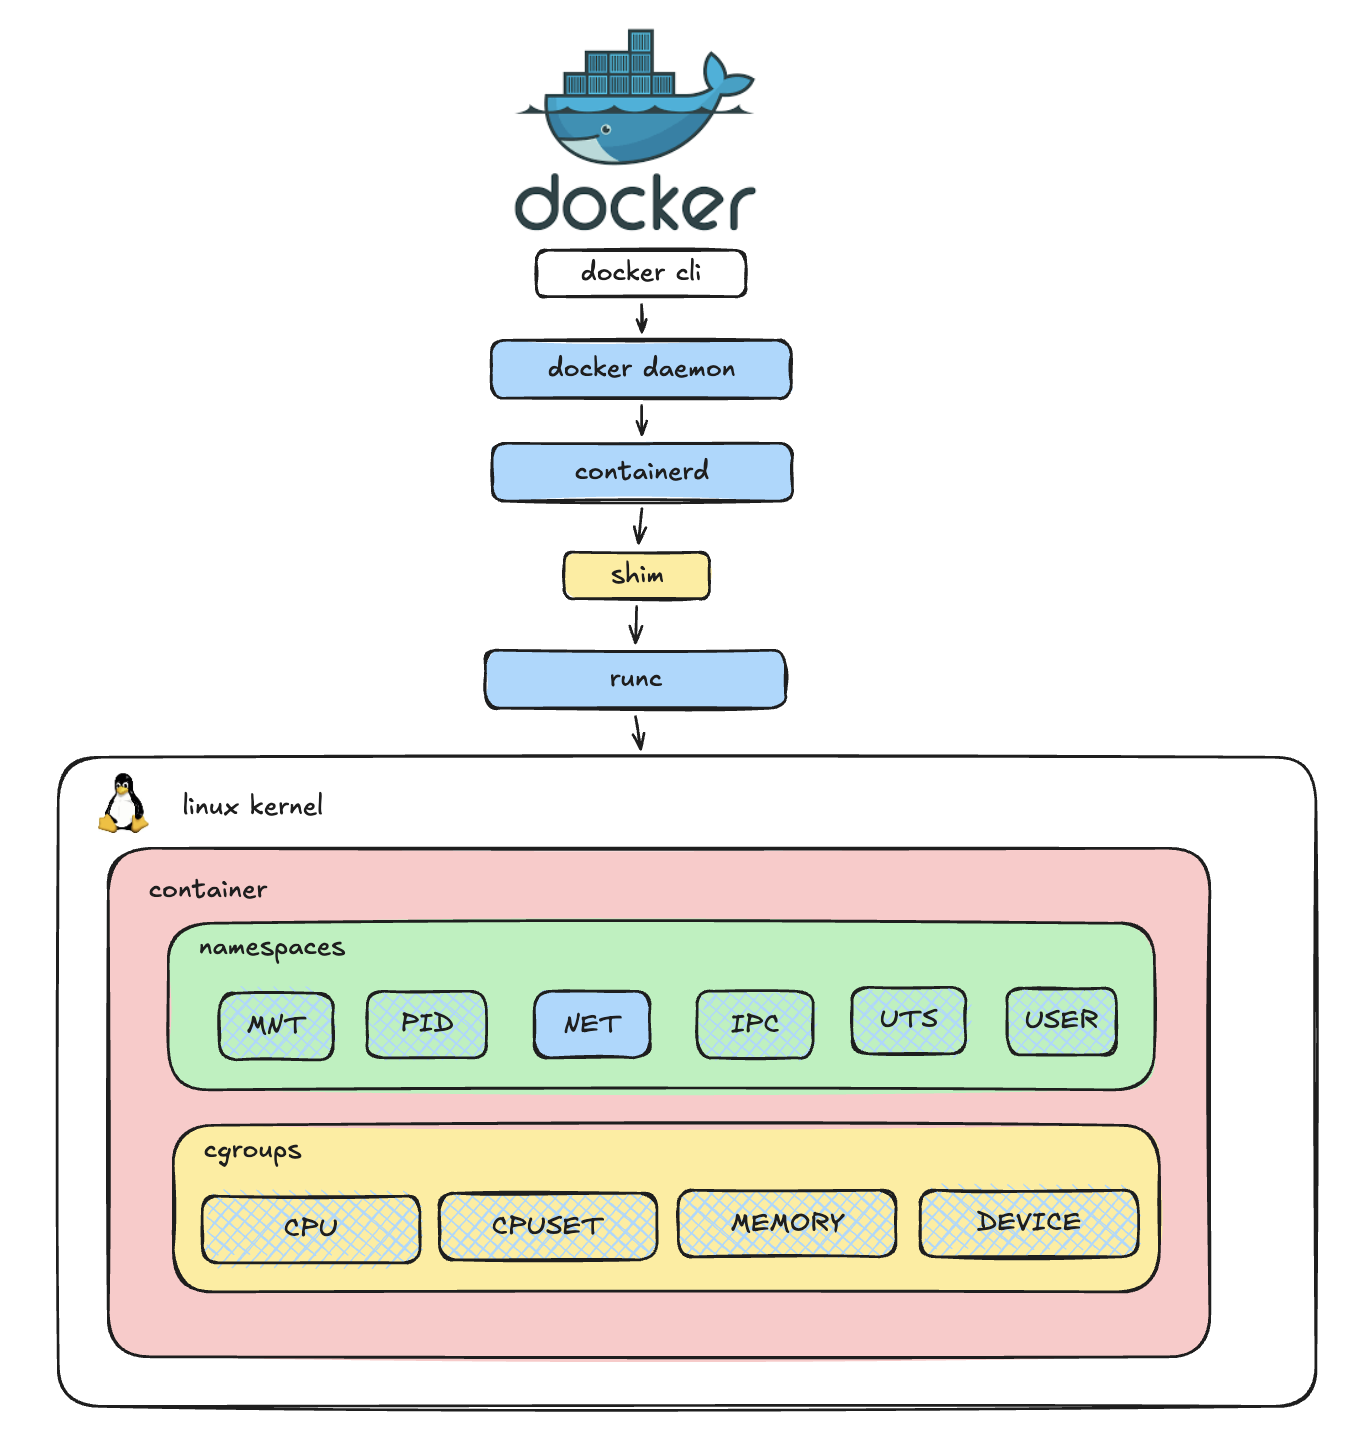
Before diving into networking, we need to understand the absolute foundation of this isolation: Linux Namespaces. Namespaces are a Linux kernel feature that partitions and isolates system resources. When you run a container, you aren't spinning up a full virtual machine; you are essentially just running a standard Linux process inside a securely isolated set of namespaces.
There are 7 primary types of namespaces in Linux:
- Mount (mnt): Isolates filesystem mount points.
- Process ID (pid): Isolates the PID number space.
- Network (net): Isolates network interfaces, routing tables, iptables, etc.
- Interprocess Communication (ipc): Isolates System V IPC and POSIX message queues.
- UNIX Timesharing System (uts): Isolates hostname and NIS domain name.
- User (user): Isolates user and group IDs.
- Control Group (cgroup): Isolates cgroup root directories.
In this series, we will focus exclusively on the Network Namespace.
The Network Namespace (netns)
A Network Namespace provides a brand new, completely isolated network stack for a process. We hear this definition a lot, but wait-what exactly is a "network stack"?
Simply put, it is the collection of network devices (interfaces), their assigned IP addresses, routing tables, and firewall rules (iptables) that dictate how traffic flows in and out of a system.
Think of creating a new network namespace like buying a brand-new physical router: it has no cables plugged in, no IP addresses assigned, and its routing table is completely empty. This is exactly how a container starts its life before a container runtime or a CNI plugin configures its network.
You can inspect the components of your current network stack using these standard Linux commands:
# List network devices (interfaces)
ip link

# List assigned IP addresses
ip addr

# View the routing table
ip route

# View firewall and NAT rules
sudo iptables --list-rules By default, every Linux machine comes with a primary, built-in network environment known as the root network namespace.
When you log into a server and run the commands we just discussed, you are viewing the network stack of this root namespace. As illustrated above, it contains your default loopback (lo) and primary network interfaces (like eth0), along with the host's main routing table and default iptables rules.
Our goal now is to step outside this default environment and create a new, completely isolated network namespace from scratch.
Building a Network Namespace
Let's get our hands dirty and build what Docker or Kubernetes does under the hood. 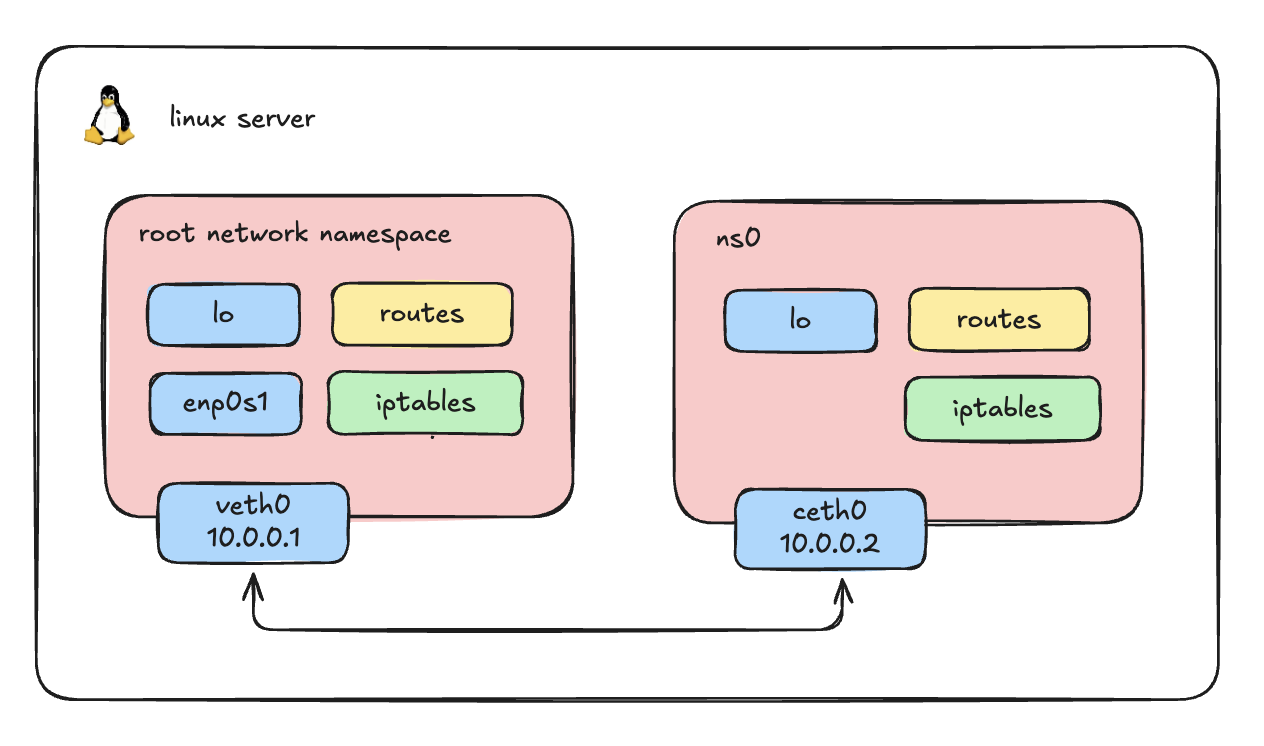
1. Create a Network Namespace (ns0)
First, we create our isolated environment.
# Create a new network namespace named ns0
sudo ip netns add ns0

# Verify it was created
ip netns list2. Create a Veth Pair
To connect our host to this isolated namespace, we need a virtual cable. In Linux, this is called a Virtual Ethernet (veth) pair. A veth pair always comes in twos-what goes in one end comes out the other.
# Create a veth pair: veth0 (for the host) and ceth0 (for the namespace)
sudo ip link add veth0 type veth peer name ceth0Verify
You should see the pair by executing:
ip link | grep -i 'veth0\|ceth0'Output
8: ceth0@veth0: <BROADCAST,MULTICAST,M-DOWN> mtu 1500 qdisc noop state DOWN mode DEFAULT group default qlen 1000
9: veth0@ceth0: <BROADCAST,MULTICAST,M-DOWN> mtu 1500 qdisc noop state DOWN mode DEFAULT group default qlen 10003. Attach the Veth Pair to the Host and ns0
By default, both ends of the veth pair are created in the host's default root network namespace. We need to move one end (ceth0) into our new namespace (ns0).
# Move ceth0 into ns0
sudo ip link set ceth0 netns ns0

# Check the host links (you will see veth0, but ceth0 is gone)
ip link list

# Result
# 9: veth0@if8: <BROADCAST,MULTICAST,UP,LOWER_UP> mtu 1500 qdisc noqueue state UP mode DEFAULT group default qlen 1000

# Check the ns0 links (you will see the loopback interface and ceth0)
sudo ip netns exec ns0 ip link list

# Result
# 1: lo: <LOOPBACK,UP,LOWER_UP> mtu 65536 qdisc noqueue state UNKNOWN mode DEFAULT group default qlen 1000 link/loopback 00:00:00:00:00:00 brd 00:00:00:00:00:00
# 8: ceth0@if9: <BROADCAST,MULTICAST,UP,LOWER_UP> mtu 1500 qdisc noqueue state UP mode DEFAULT group default qlen 1000 link/ether c6:78:fd:d5:9b:cd brd ff:ff:ff:ff:ff:ff link-netnsid 04. Assign IP Addresses and Bring Interfaces UP
Note: Just plugging in a virtual cable doesn't grant network access. We need to assign IP addresses and turn the interfaces "up", just like physical hardware.
# 1. Configure the Host side
sudo ip addr add 10.0.0.1/24 dev veth0
sudo ip link set veth0 up

# 2. Configure the Namespace side
sudo ip netns exec ns0 ip addr add 10.0.0.2/24 dev ceth0
sudo ip netns exec ns0 ip link set ceth0 up

# 3. Bring up the loopback interface inside the namespace (best practice)
sudo ip netns exec ns0 ip link set lo up5. Verify Connectivity
Let's test if the host can talk to our isolated "container" namespace, and vice versa.
# Ping from Host to ns0
ping -c 1 10.0.0.2

# Result
# PING 10.0.0.2 (10.0.0.2) 56(84) bytes of data.
# 64 bytes from 10.0.0.2: icmp_seq=1 ttl=64 time=0.296 ms

# Ping from ns0 to Host
sudo ip netns exec ns0 ping -c 1 10.0.0.1

# Result
# PING 10.0.0.1 (10.0.0.1) 56(84) bytes of data.
# 64 bytes from 10.0.0.1: icmp_seq=1 ttl=64 time=0.168 ms6. Verify Isolation
Our namespace can talk to the host, but can it reach the outside world?
# Try to ping Google DNS from inside ns0
sudo ip netns exec ns0 ping 8.8.8.8

# Result
# ping: connect: Network is unreachableIt fails because ns0 has its own isolated routing table with no default gateway or NAT rules configured to route traffic out to the physical internet. True isolation!
7. Scale it up: Create ns1
In reality, we will have more than one container, so let's create a second namespace, ns1.
# Create ns1 and its veth pair
sudo ip netns add ns1
sudo ip link add veth1 type veth peer name ceth1
sudo ip link set ceth1 netns ns1

# Configure Host side
sudo ip addr add 10.0.0.3/24 dev veth1
sudo ip link set veth1 up

# Configure ns1 side
sudo ip netns exec ns1 ip addr add 10.0.0.4/24 dev ceth1
sudo ip netns exec ns1 ip link set ceth1 up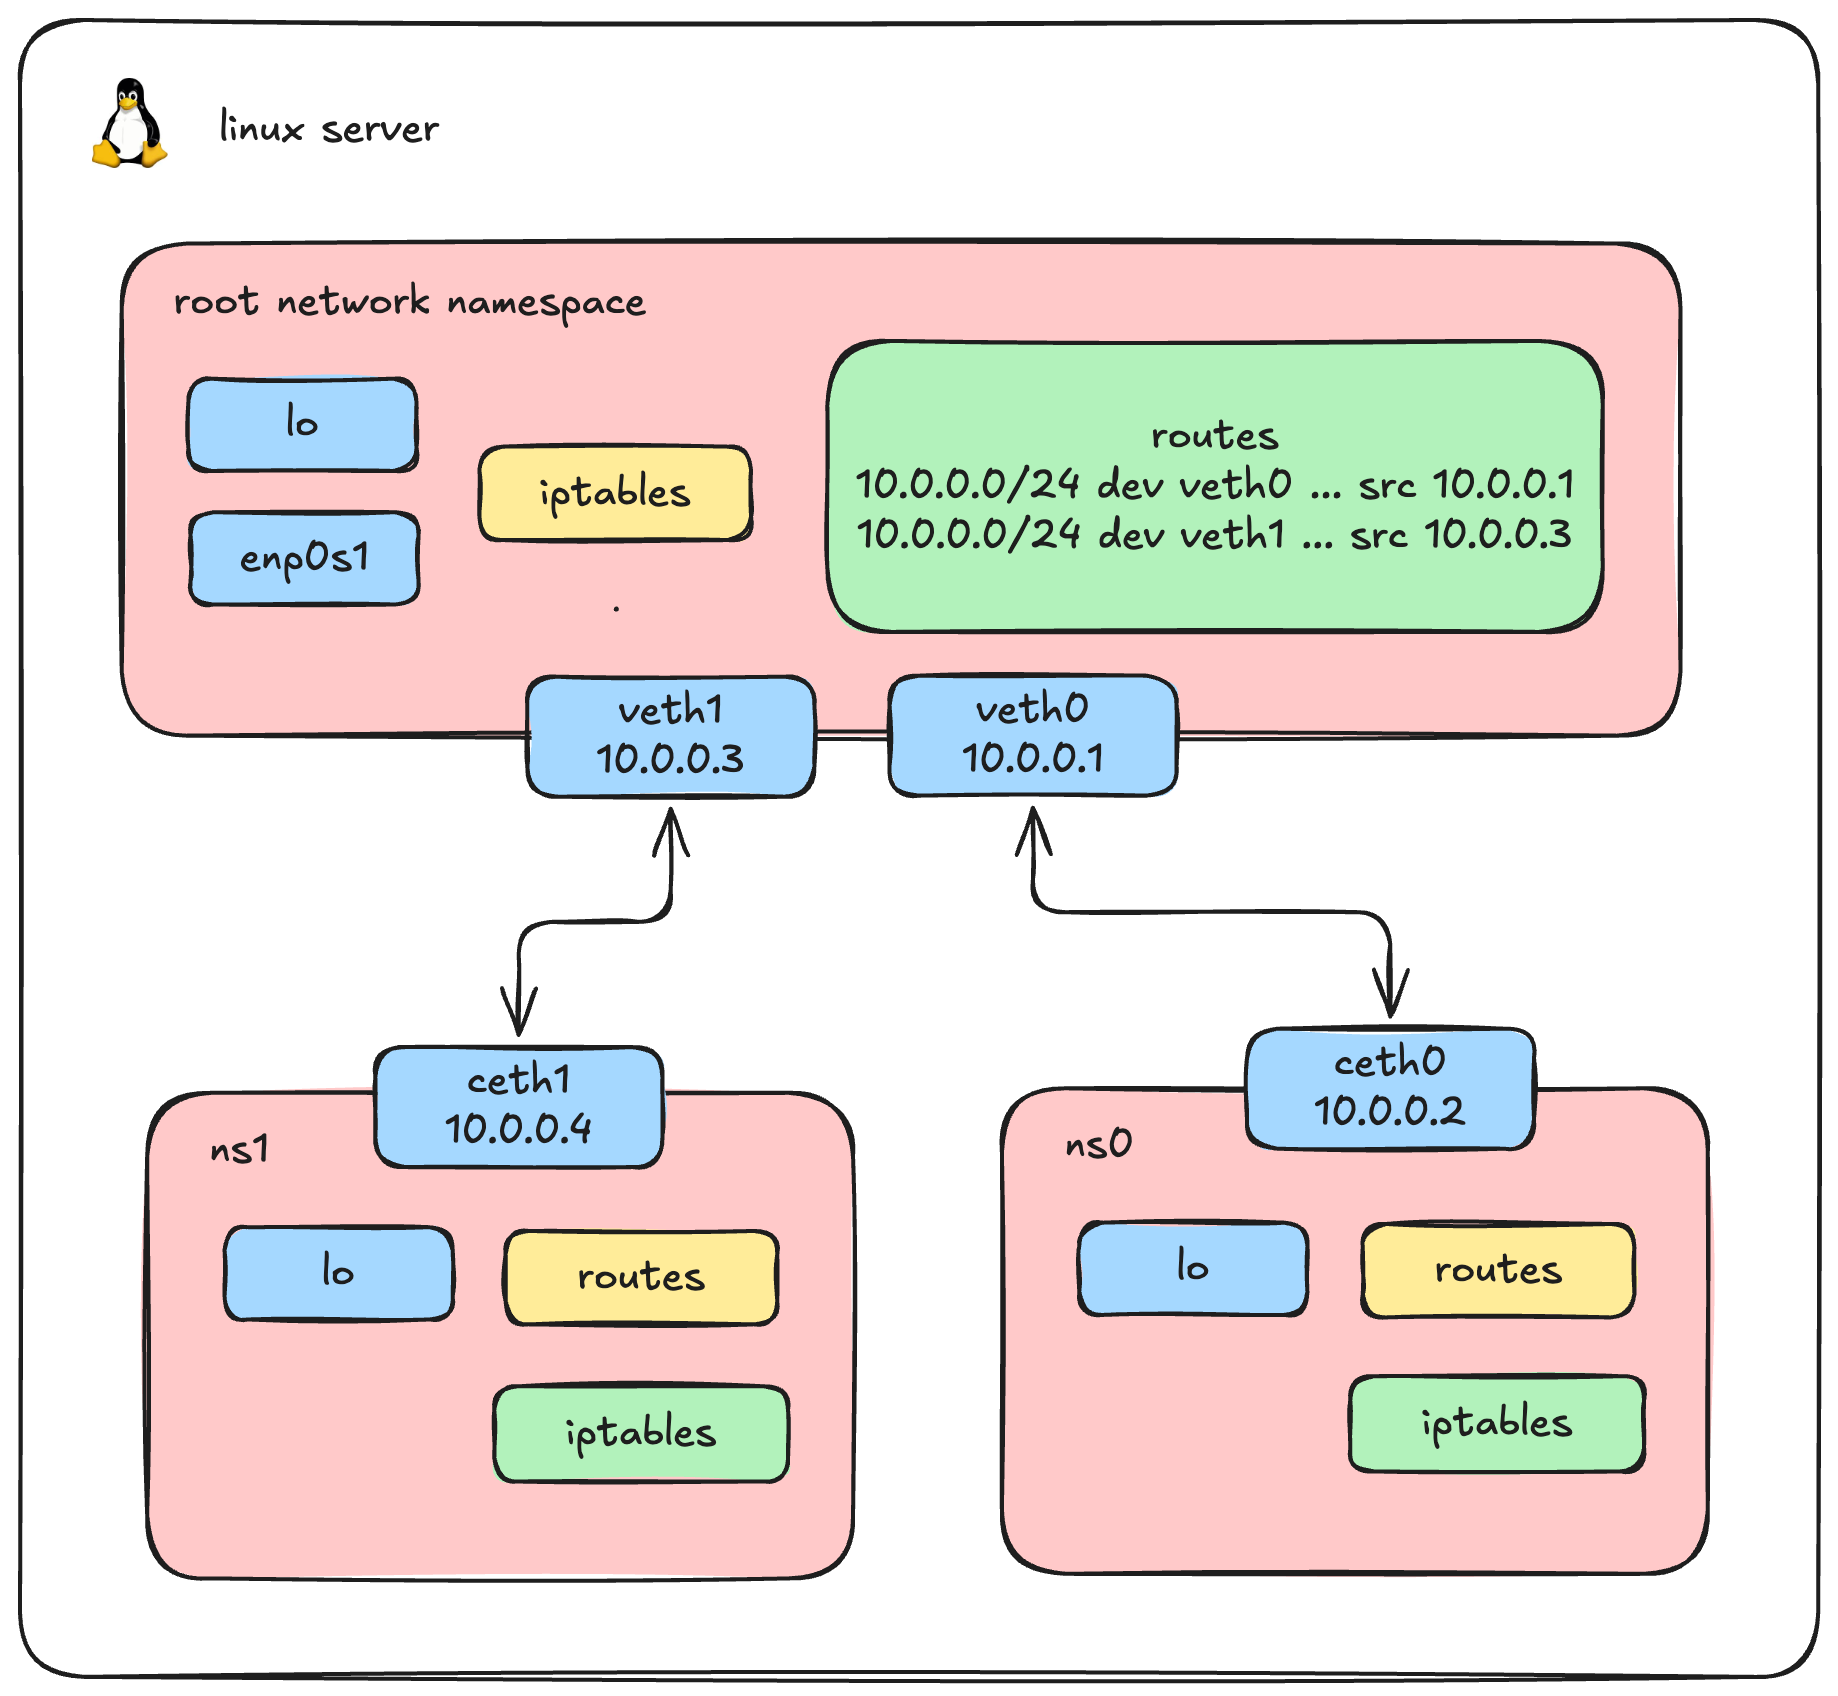
sudo ip netns exec ns1 ip link set lo upSo now, we have two isolated network namespaces, ns0 and ns1, and both are independently connected to the host via their own veth pairs.
We logically expect that ns0 and ns1 can both ping the host. Let's verify this assumption.
First, let's ping from ns0:
# Ping from ns0 to Host (10.0.0.1)
sudo ip netns exec ns0 ping -c 1 10.0.0.1
# Result: SUCCESSNow, let's try pinging from ns1 to the Host (10.0.0.3):
ip netns exec ns1 ping 10.0.0.3 -c 2
# PING 10.0.0.3 (10.0.0.3) 56(84) bytes of data.
#
# --- 10.0.0.3 ping statistics ---
# 2 packets transmitted, 0 received, 100% packet loss, time 1061msWait, why did the ping from ns1 to the host fail with 100% packet loss? Let's run a continuous ping from ns1 and debug the incoming traffic on the host's veth1 interface using tcpdump:
root@ty-labs:~# tcpdump -i veth1

# 04:30:14.830971 IP 10.0.0.4 > ty-labs: ICMP echo request, id 5484, seq 1, length 64
# 04:30:15.892046 IP 10.0.0.4 > ty-labs: ICMP echo request, id 5484, seq 2, length 64The ICMP echo requests from ns1 (10.0.0.4) are successfully reaching the host on veth1! The problem isn't the incoming traffic; the host simply doesn't know how to send the reply back correctly. Let's look at how the host routes packets destined for 10.0.0.4:
ip route get 10.0.0.4
# 10.0.0.4 dev veth0 src 10.0.0.1 uid 0Notice the problem? The host is trying to send the reply out through veth0 instead of veth1!
Let's view the host's full routing table to understand why this happens:
root@ty-labs:~# ip route

# 10.0.0.0/24 dev veth0 proto kernel scope link src 10.0.0.1
# 10.0.0.0/24 dev veth1 proto kernel scope link src 10.0.0.3Here lies our routing conflict. Because both veth0 and veth1 were assigned IP addresses in the exact same 10.0.0.0/24 subnet, the Linux kernel created two overlapping routing rules. When trying to route traffic to 10.0.0.4, the host matches the first rule it sees (10.0.0.0/24 dev veth0) and sends the packet down the wrong virtual cable!
The Scaling Problem
To fix the unreachability issue, we could create more direct veth pairs and manually manage complex IP subnets. But imagine scaling this to 100 containers, we would need thousands of virtual cables. It becomes a completely unmanageable mess.
So, is there another way to handle this?
Yes, the Linux Bridge.
Instead of tangled direct connections, we simply plug every namespace into a central virtual switch. We will tear down these direct connections and bring the Linux Bridge into the picture to solve this once and for all!
Setting Up the Linux Bridge, Container to container networking
Let's tear down our old direct connections and build a proper, scalable bridged network.
# let's clean up the old interfaces
ip netns delete ns0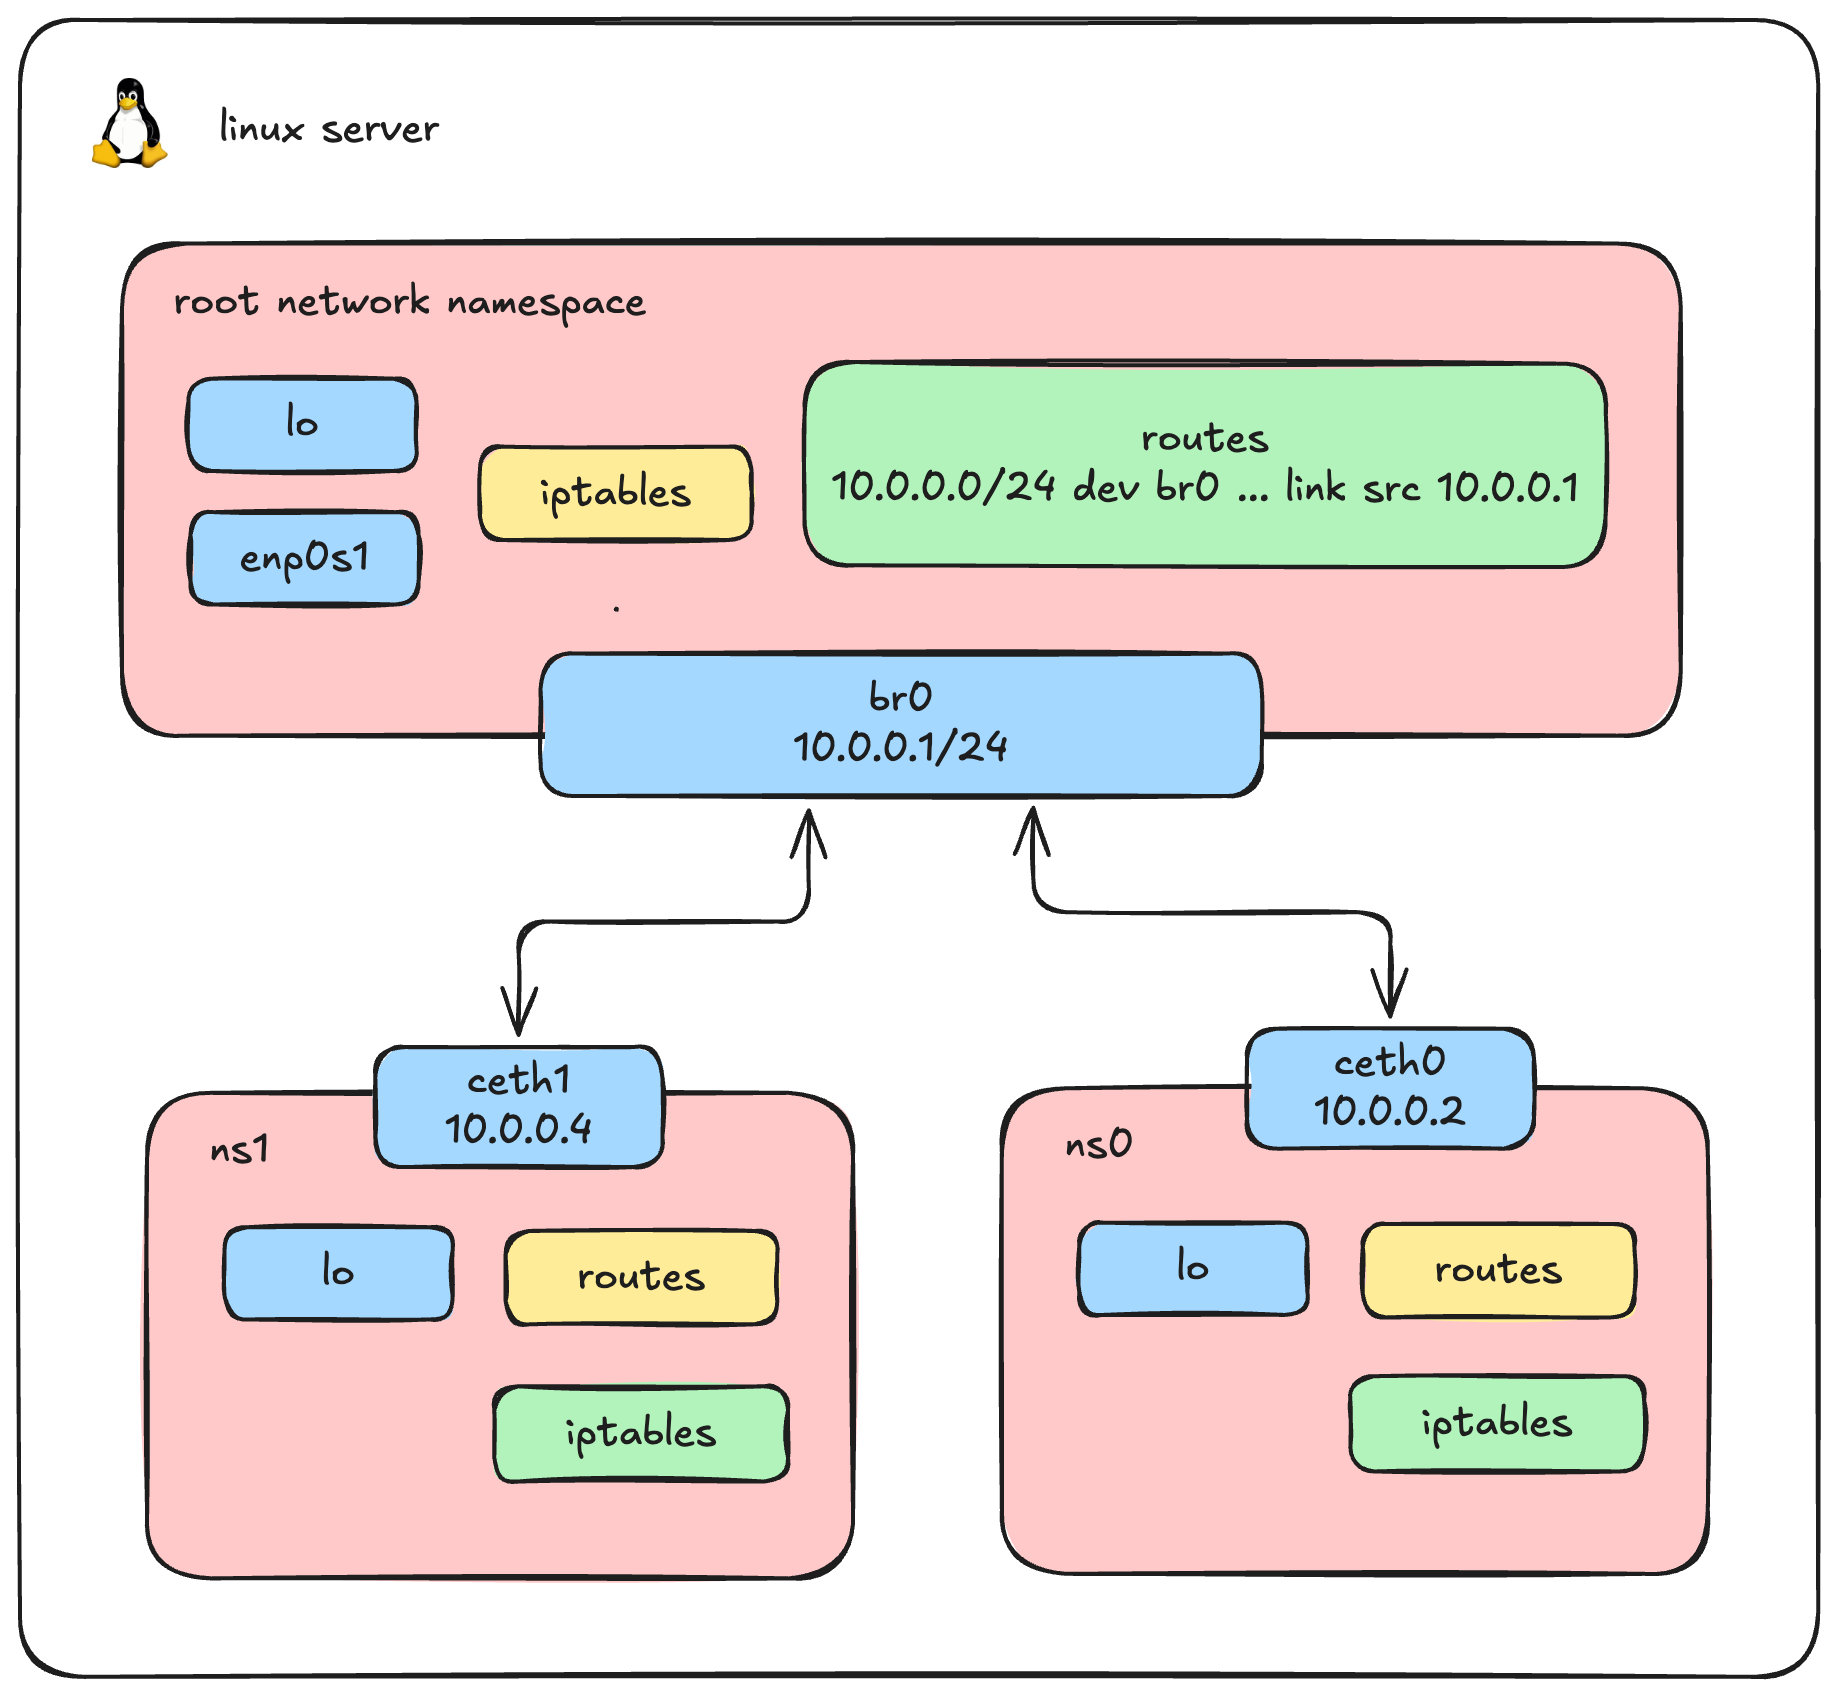
ip netns delete ns11. Create the Virtual Bridge (br0)
First, we create our virtual switch. Instead of assigning IP addresses directly to individual veth cables on the host, we assign a single IP address directly to the bridge. This IP will act as the default gateway for all our containers.
# Create a new bridge device named br0
ip link add br0 type bridge

# Assign an IP address to the bridge and bring it UP
ip addr add dev br0 10.0.0.1/24
ip link set br0 up2. Create Namespaces and Veth Pairs
Next, we recreate our namespaces (ns0 and ns1) and their virtual cables. Notice one critical difference from our previous setup: we no longer assign IP addresses to the host ends (veth0 and veth1). We just bring them UP, ready to be plugged in.
# Create ns0 and its veth pair
ip netns add ns0
ip link add veth0 type veth peer name ceth0
ip link set ceth0 netns ns0
ip link set veth0 up

# Configure the namespace side (ns0)
ip netns exec ns0 ip addr add 10.0.0.2/24 dev ceth0
ip netns exec ns0 ip link set ceth0 up
ip netns exec ns0 ip link set lo up

# Create ns1 and its veth pair
ip netns add ns1
ip link add veth1 type veth peer name ceth1
ip link set ceth1 netns ns1
ip link set veth1 up

# Configure the namespace side (ns1)
ip netns exec ns1 ip addr add 10.0.0.4/24 dev ceth1
ip netns exec ns1 ip link set ceth1 up
ip netns exec ns1 ip link set lo up3. Attach Veth Pairs to the Bridge
Right now, our virtual cables are dangling on the host side. We need to plug them into our newly created switch (br0). We do this by setting the bridge as the "master" of our host-side interfaces.
# "Plug" veth0 and veth1 into the br0 switch
ip link set veth0 master br0
ip link set veth1 master br04. Verify Connectivity
With both containers plugged into the same central switch, they should now be able to communicate perfectly on the same subnet without any routing conflicts. Let's test it:
Ping ns1 from ns0:
ip netns exec ns0 ping 10.0.0.4 -c 1

# PING 10.0.0.4 (10.0.0.4) 56(84) bytes of data.
# 64 bytes from 10.0.0.4: icmp_seq=1 ttl=64 time=0.337 ms
#
# --- 10.0.0.4 ping statistics ---
# 1 packets transmitted, 1 received, 0% packet loss, time 0ms
# rtt min/avg/max/mdev = 0.337/0.337/0.337/0.000 msPing ns0 from ns1:
ip netns exec ns1 ping 10.0.0.2 -c 1

# PING 10.0.0.2 (10.0.0.2) 56(84) bytes of data.
# 64 bytes from 10.0.0.2: icmp_seq=1 ttl=64 time=0.156 ms
#
# --- 10.0.0.2 ping statistics ---
# 1 packets transmitted, 1 received, 0% packet loss, time 0ms
# rtt min/avg/max/mdev = 0.156/0.156/0.156/0.000 ms5. Inspecting the Layer 2 Traffic
Because ns0 and ns1 are connected to the same Layer 2 bridge, they can reach each other directly using ARP (Address Resolution Protocol) without routing through the host's IP stack. We can verify this by checking their neighbor tables:
ip netns exec ns0 ip neigh
# 10.0.0.4 dev ceth0 lladdr 62:f9:58:b8:84:ca REACHABLE

ip netns exec ns1 ip neigh
# 10.0.0.2 dev ceth1 lladdr c6:78:fd:d5:9b:cd REACHABLETo see this connection in action, we can monitor the traffic passing across the br0 device itself:
tcpdump -i br0

# 06:27:36.845487 ARP, Request who-has 10.0.0.4 tell 10.0.0.2, length 28
# 06:27:36.845440 ARP, Request who-has 10.0.0.2 tell 10.0.0.4, length 28
# 06:27:36.845541 ARP, Reply 10.0.0.4 is-at 62:f9:58:b8:84:ca (oui Unknown), length 28
# 06:27:36.845558 ARP, Reply 10.0.0.2 is-at c6:78:fd:d5:9b:cd (oui Unknown), length 28The bridge successfully acts as a central hub, forwarding ARP requests and ICMP traffic directly between our isolated environments-precisely how Docker allows containers to communicate on the default docker0 bridge!
Outbound Connectivity: Enabling Internet Access via IP Masquerading
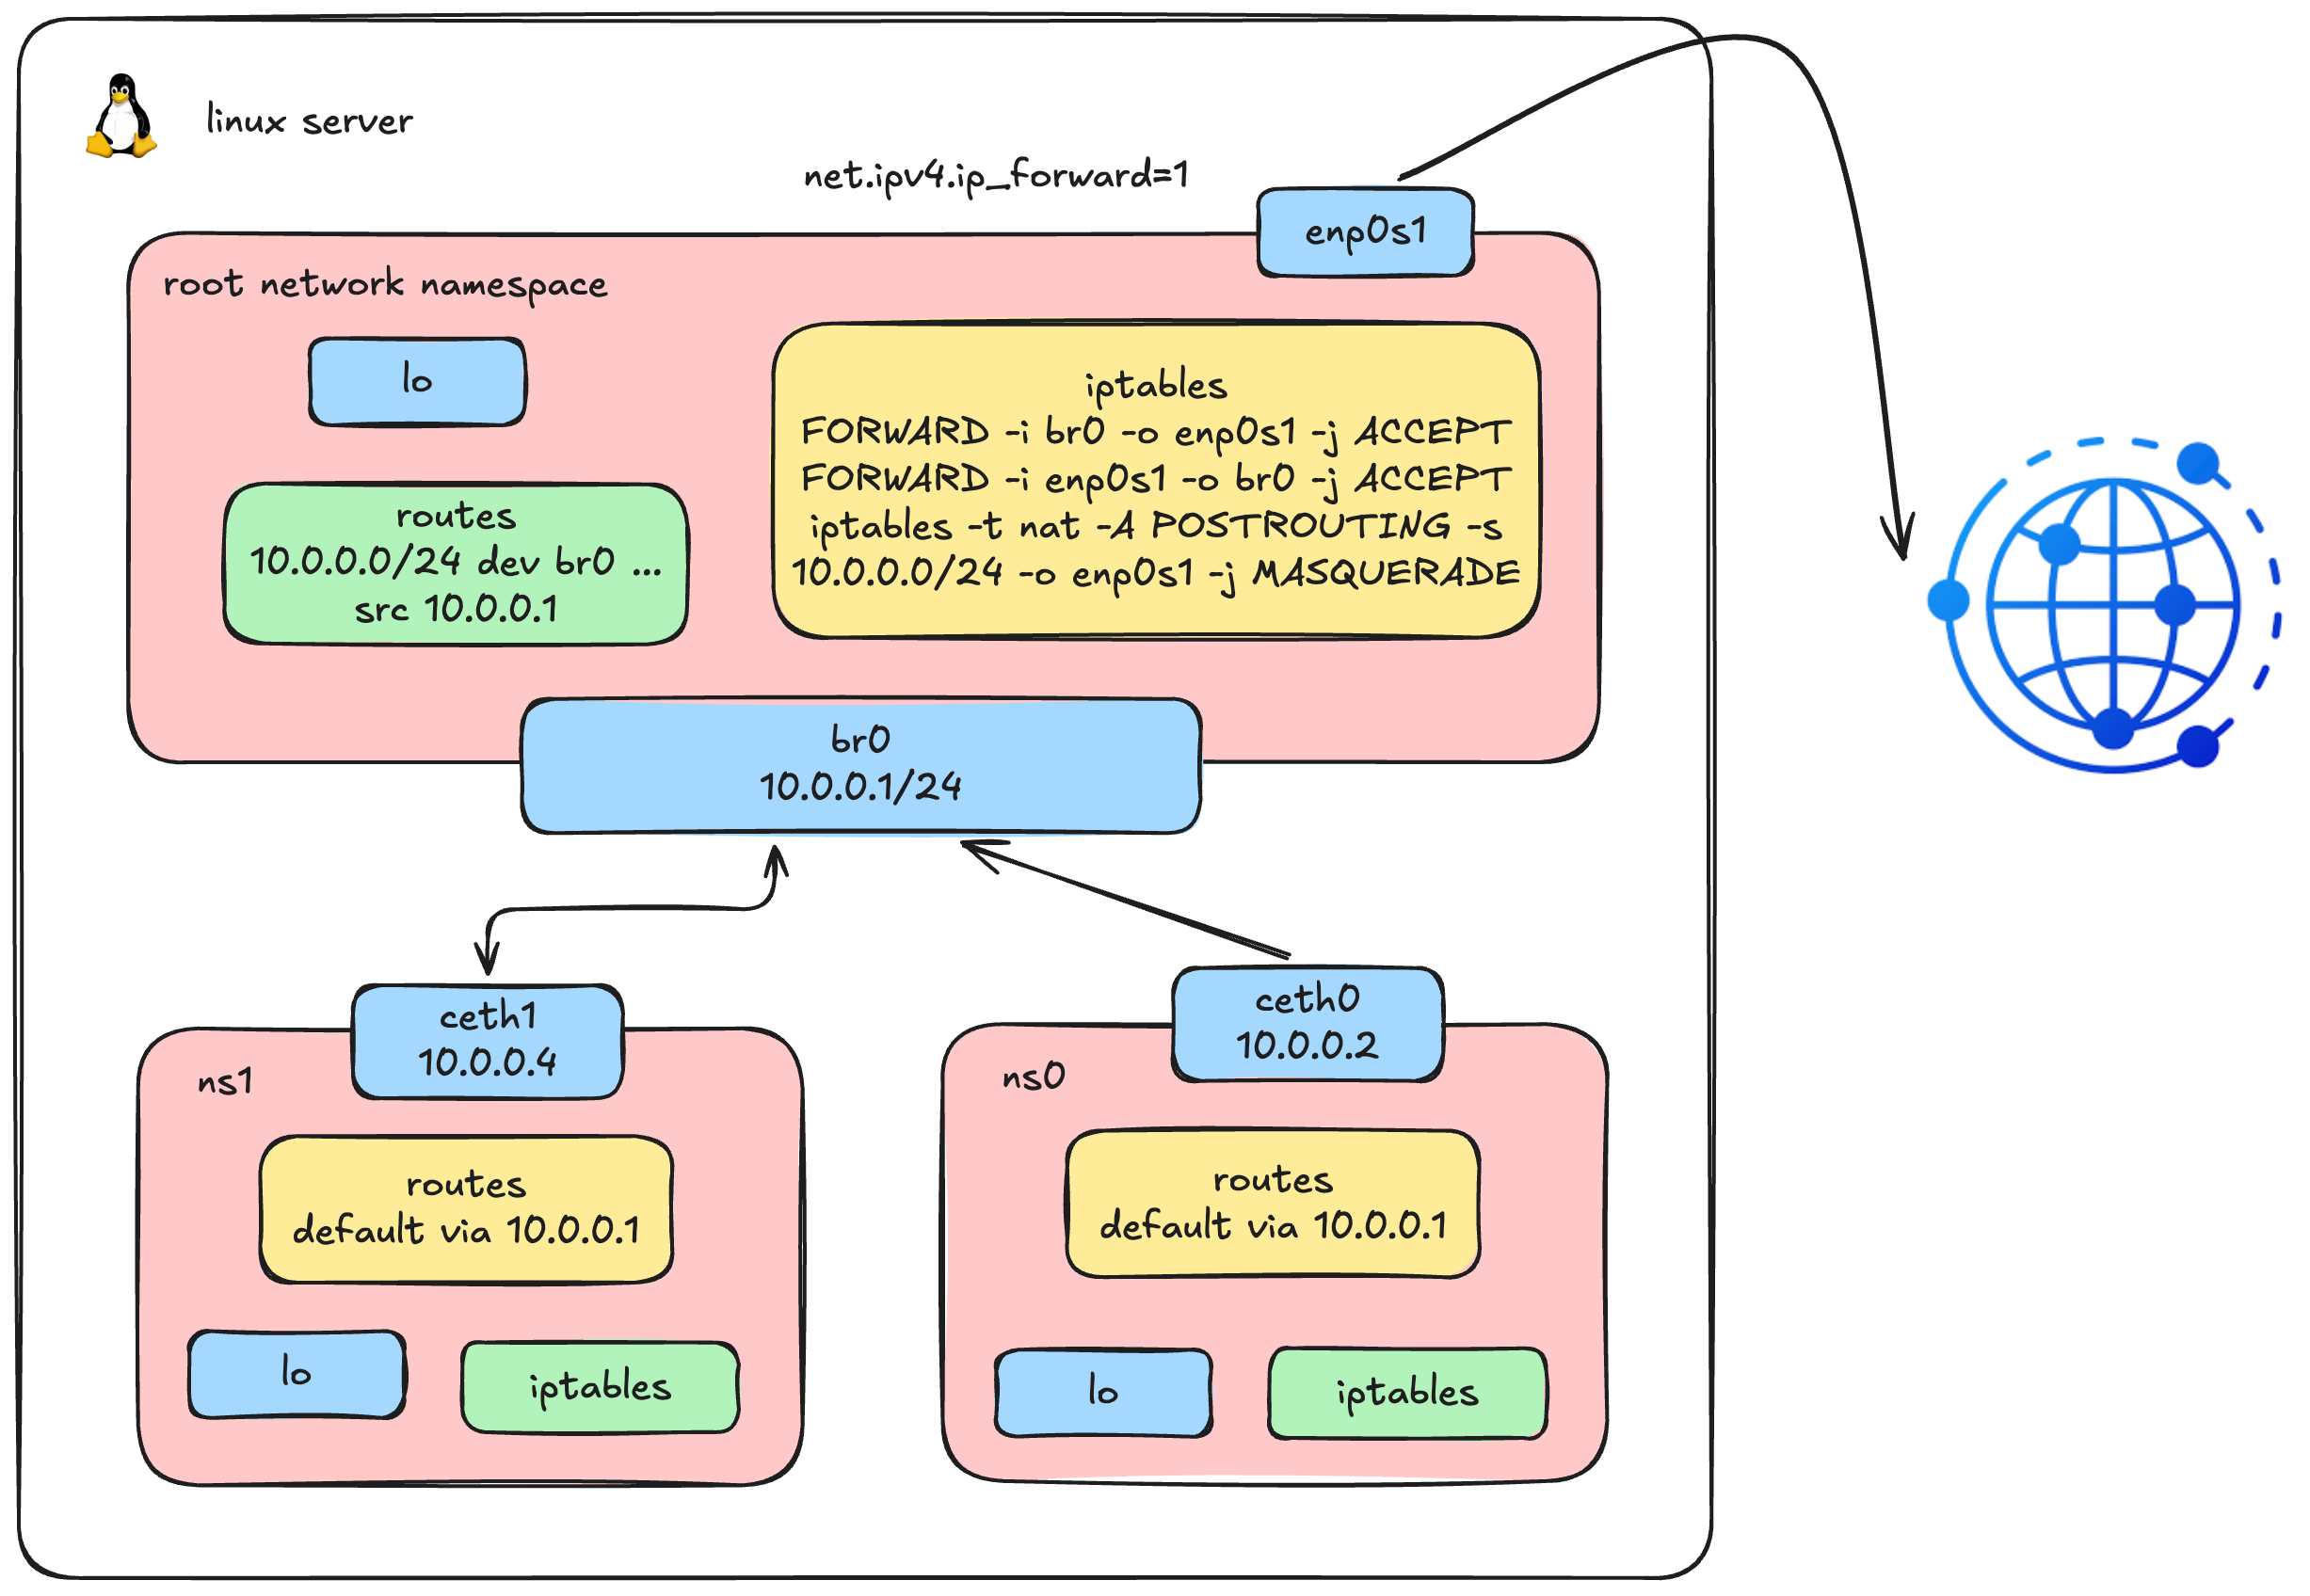
Don't worry if you don't fully understand this diagram yet; this is exactly what we're going to build in this section.
We now have container-to-container communication working beautifully through the bridge. But what about reaching the outside world? Let's try pinging Google's DNS from inside ns0:
ip netns exec ns0 ping 8.8.8.8

# ping: connect: Network is unreachableNo luck. The error message Network is unreachable tells us the kernel couldn't even find a route for this destination. Let's inspect the routing table inside ns0 to understand why:
ip netns exec ns0 ip route

# 10.0.0.0/24 dev ceth0 proto kernel scope link src 10.0.0.2There it is - ns0 only knows about the local 10.0.0.0/24 subnet. It has absolutely no idea where to send traffic destined for anything outside that range. We need to add a default gateway pointing to our bridge IP (10.0.0.1), telling ns0: "for any destination you don't have a specific route for, send it to the bridge."
1. Add a Default Gateway
# Set the bridge as the default gateway for ns0
ip netns exec ns0 ip route add default via 10.0.0.1Let's try the ping again:
ip netns exec ns0 ping 8.8.8.8 -c 2

# PING 8.8.8.8 (8.8.8.8) 56(84) bytes of data.
#
# --- 8.8.8.8 ping statistics ---
# 2 packets transmitted, 0 received, 100% packet loss, time 1017msStill failing - but notice the error changed! We no longer get Network is unreachable. The packets are being sent, but we're getting 100% packet loss. This means the routing is partially working; the packets are leaving ns0, but something is dropping them along the way.
2. Debug: Trace the Packet Path
Let's use tcpdump to trace exactly where the packets are going. First, let's check if traffic is arriving at the bridge:
tcpdump -i br0 -n icmp

# 11:56:44.370536 IP 10.0.0.2 > 8.8.8.8: ICMP echo request, id 7693, seq 1, length 64
# 11:56:45.372357 IP 10.0.0.2 > 8.8.8.8: ICMP echo request, id 7693, seq 2, length 64The packets are successfully arriving at br0. But the bridge is a Layer 2 device - it can switch frames between its ports, but it doesn't know how to route traffic to a completely different network like 8.8.8.8. For that, the Linux kernel needs to forward the packets from br0 out through the host's physical network interface (enp0s1).
By default, Linux does not forward packets between network interfaces - this behavior is controlled by a kernel parameter. We need to enable it first, then configure iptables rules to specify exactly which traffic is allowed to pass through.
3. Enable IP Forwarding
First, we enable IP forwarding at the kernel level. This is the master switch that tells the kernel: "yes, you are allowed to route packets between different network interfaces." Without this, the kernel will silently drop any packet that tries to cross from one interface to another - no matter what your iptables rules say.
# Enable IP forwarding (disabled by default on most Linux distros)
sysctl -w net.ipv4.ip_forward=1

# net.ipv4.ip_forward = 1Note: This change is temporary and will be lost after a reboot. To make it permanent, add
net.ipv4.ip_forward=1to/etc/sysctl.conf.
Next, we add two FORWARD rules in iptables to control which traffic is allowed to be forwarded:
# Allow outbound: forward traffic from br0 to the physical interface
iptables -A FORWARD -i br0 -o enp0s1 -j ACCEPT

# Allow return traffic: only permit replies to connections initiated from inside
iptables -A FORWARD -i enp0s1 -o br0 -m state --state RELATED,ESTABLISHED -j ACCEPTVerify the rules are in place:
iptables -S | grep br0

# -A FORWARD -i br0 -o enp0s1 -j ACCEPT
# -A FORWARD -i enp0s1 -o br0 -m state --state RELATED,ESTABLISHED -j ACCEPTLet's try the ping once more:
ip netns exec ns0 ping 8.8.8.8 -c 2

# PING 8.8.8.8 (8.8.8.8) 56(84) bytes of data.
#
# --- 8.8.8.8 ping statistics ---
# 2 packets transmitted, 0 received, 100% packet loss, time 1006msStill failing. But we're making progress - let's dig deeper. Is the traffic actually making it all the way to the physical interface?
4. Debug: Check the Physical Interface
tcpdump -i enp0s1 -n icmp and host 8.8.8.8

# 12:00:26.941597 IP 10.0.0.2 > 8.8.8.8: ICMP echo request, id 7713, seq 1, length 64
# 12:00:27.963995 IP 10.0.0.2 > 8.8.8.8: ICMP echo request, id 7713, seq 2, length 64The packets are being forwarded to enp0s1 and leaving the host! So the forwarding rules are working correctly. But look carefully at the source IP address: it's 10.0.0.2 - the private IP of our namespace.
Here's the problem: when these packets arrive at Google's server (8.8.8.8), Google tries to send the reply back to 10.0.0.2. But 10.0.0.2 is a private, non-routable IP address - it doesn't exist on the public internet. The reply packets have nowhere to go and are simply dropped.
This is the exact same reason your home devices (which typically have 192.168.x.x addresses) can access the internet: your home router performs Network Address Translation (NAT), replacing the private source IP with the router's public IP before sending the packet out.
5. Enable IP Masquerading (SNAT)
We need to do exactly what a home router does - replace the container's private source IP with the host's IP before the packet leaves the machine. Linux provides this capability through iptables MASQUERADE, a form of Source NAT (SNAT):
# Masquerade: replace the source IP of outgoing packets from our subnet
# with the host's IP address on the outbound interface
iptables -t nat -A POSTROUTING -s 10.0.0.0/16 -o enp0s1 -j MASQUERADEThis rule tells the kernel: "For any packet originating from the 10.0.0.0/16 subnet that is about to leave through enp0s1, rewrite its source IP to the host's own IP address. When the reply comes back, automatically reverse the translation and deliver it to the original sender."
Now let's test:
ip netns exec ns0 ping 8.8.8.8 -c 2

# PING 8.8.8.8 (8.8.8.8) 56(84) bytes of data.
# 64 bytes from 8.8.8.8: icmp_seq=1 ttl=117 time=28.0 ms
# 64 bytes from 8.8.8.8: icmp_seq=2 ttl=117 time=23.2 ms
#
# --- 8.8.8.8 ping statistics ---
# 2 packets transmitted, 2 received, 0% packet loss, time 1001ms
# rtt min/avg/max/mdev = 23.200/25.600/28.000/2.400 msIt works! Our container namespace now has full internet connectivity. This is precisely the mechanism Docker uses to give containers outbound internet access on the default bridge network - a combination of default gateway routing, IP forwarding, and iptables MASQUERADE.
Ingress Traffic: Port Forwarding from Host to Container
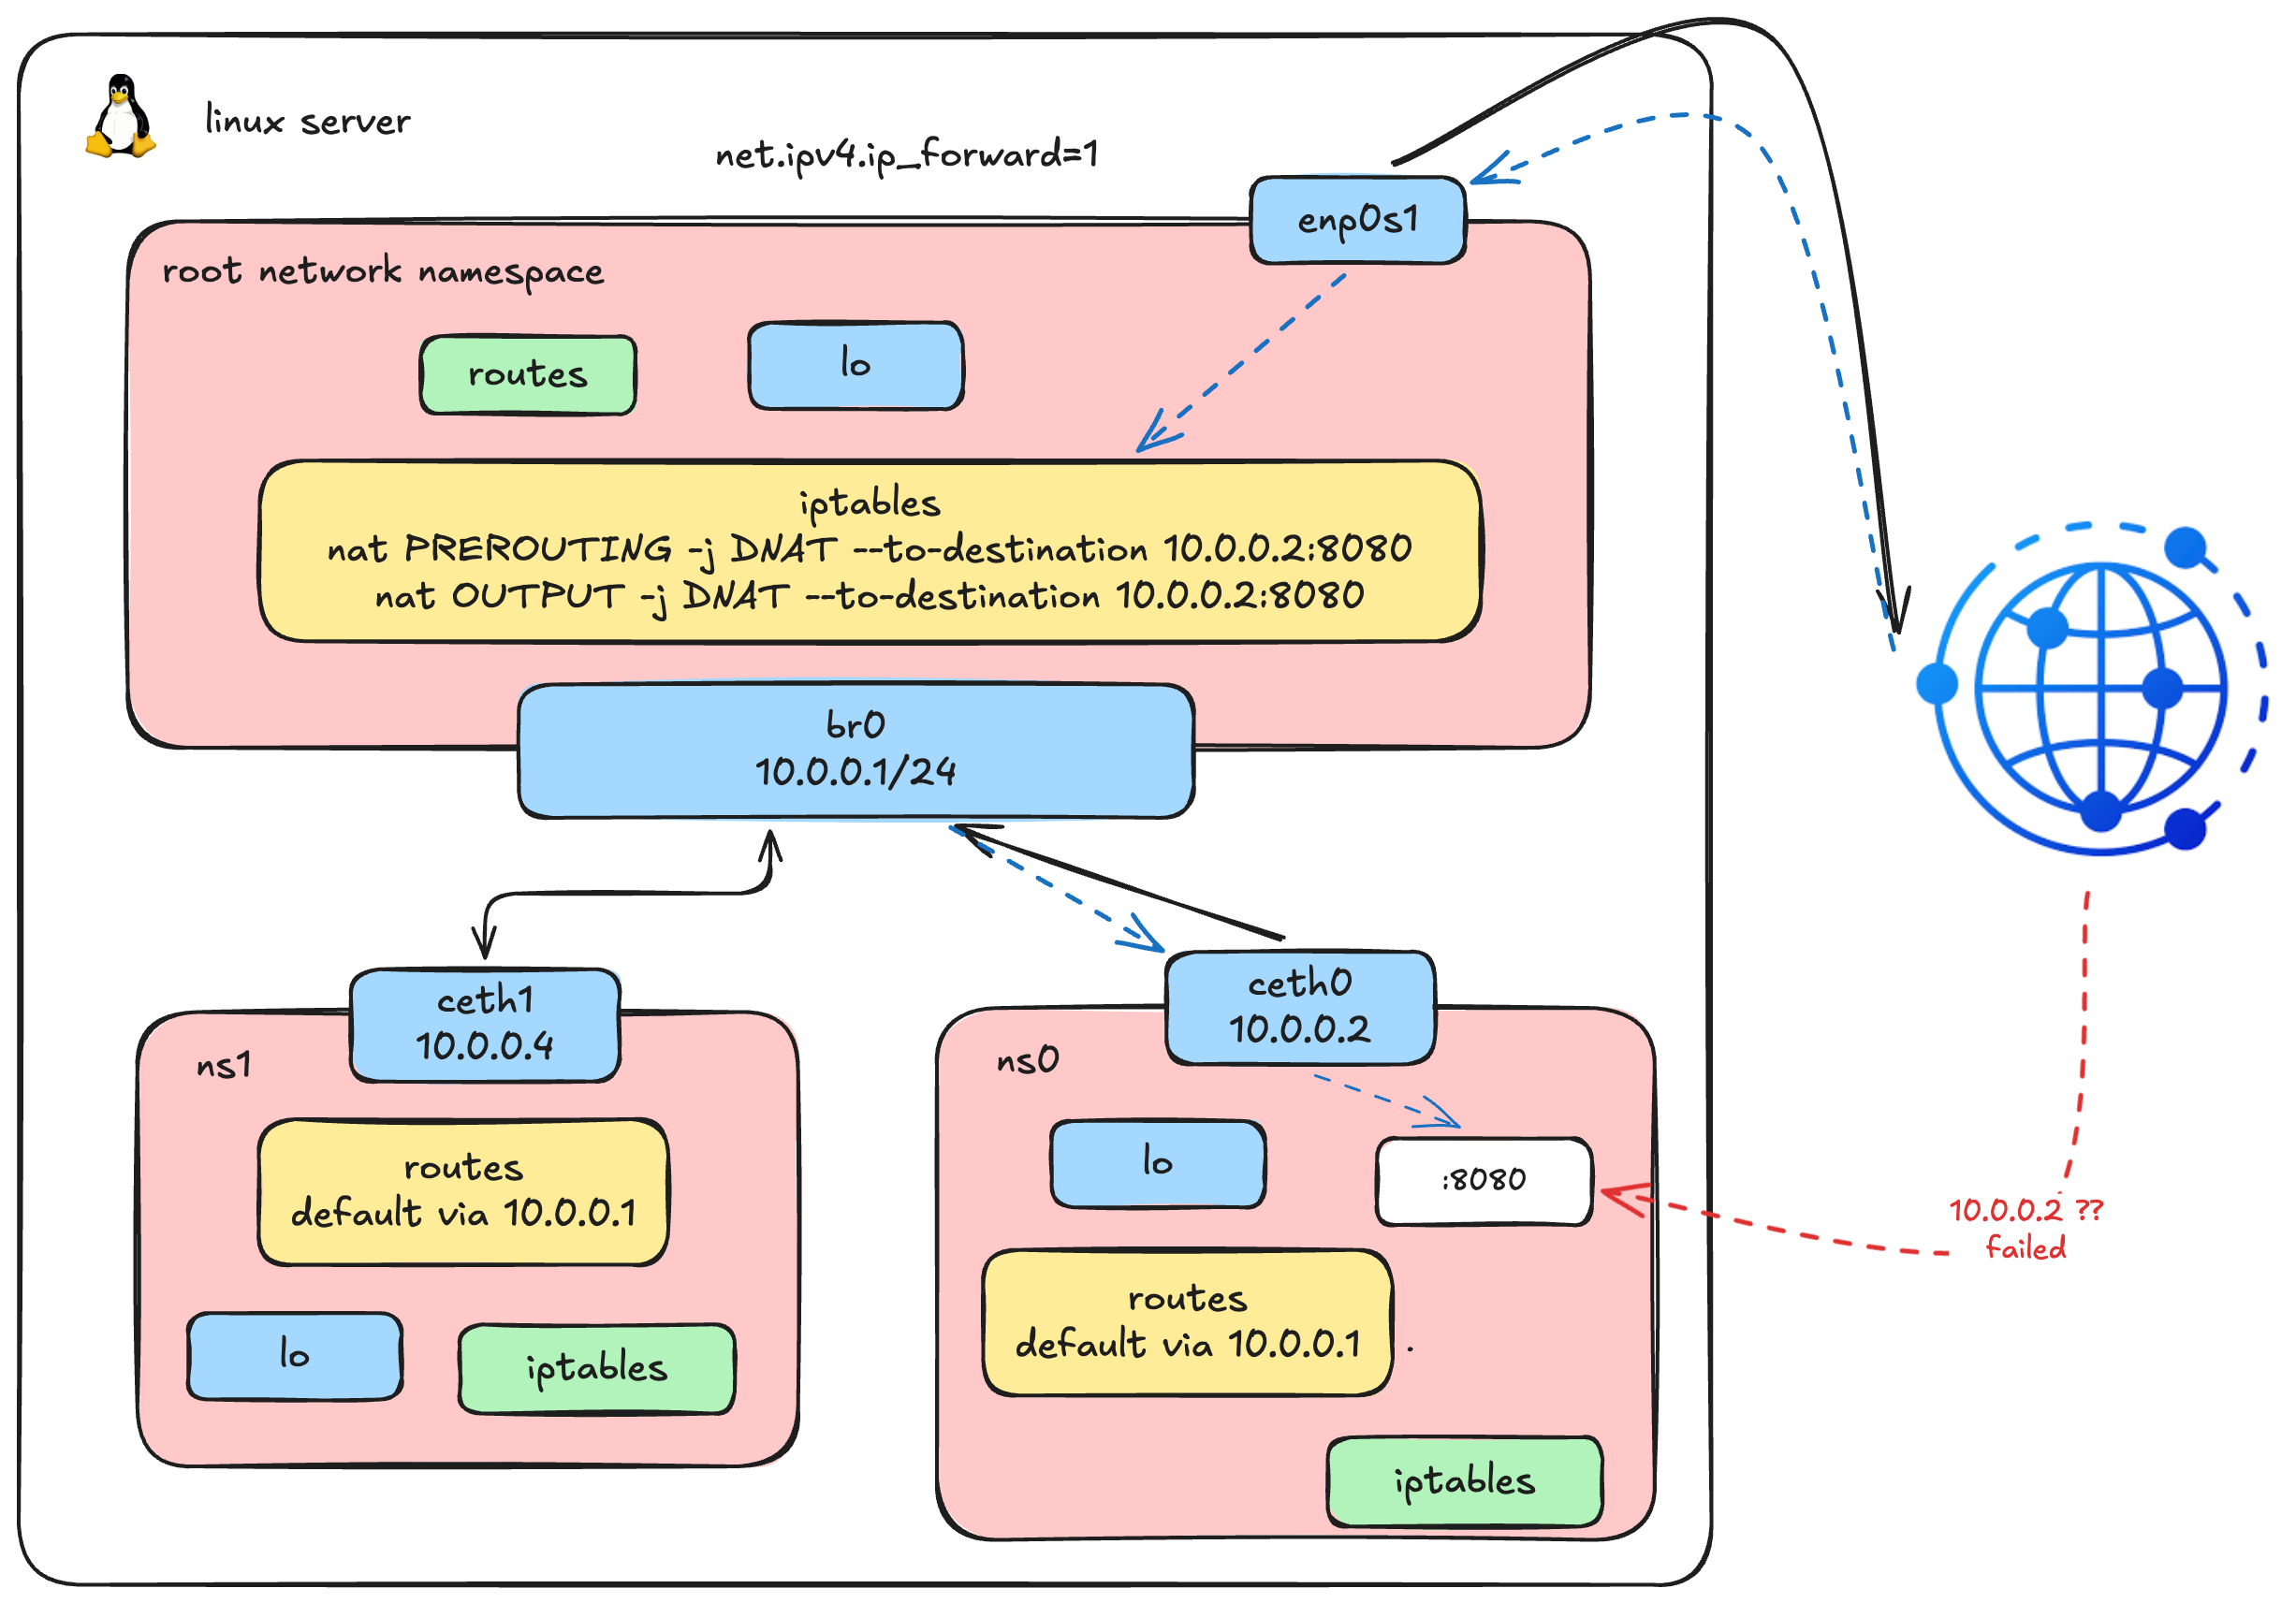 This diagram illustrates our complete network architecture after adding the final components for inbound traffic.
Our containers can now talk to each other and reach the internet. But networking is a two-way street - what if we want external clients to reach a service running inside a container? This is the final piece of the puzzle.
1. Deploy a Web Server Inside ns0
Let's simulate a real-world scenario by running a simple HTTP server inside our namespace:
# Start a basic HTTP server on port 8080 inside ns0
ip netns exec ns0 python3 -m http.server --bind 10.0.0.2 8080 &2. Access from the Host via Bridge IP
Since the host is directly connected to the bridge (br0) on the same 10.0.0.0/16 subnet, we can reach the container's IP directly:
curl 10.0.0.2:8080

# <!DOCTYPE HTML>
# <html lang="en">
# <head>
#   <meta charset="utf-8">
#   <title>Directory listing for /</title>
# ...It works! The host can reach the web server through the bridge. But here's the thing - only the host knows about 10.0.0.2. What about external users who want to access this web server?
3. The Problem: External Clients Can't Reach Private IPs
An external client only knows the host's IP address (e.g., 192.168.64.5). They have no idea 10.0.0.2 exists - it's a private address living inside an isolated namespace. If someone tries to connect to the host on port 8080, nothing is listening there:
curl 192.168.64.5:8080

# curl: (7) Failed to connect to 192.168.64.5 port 8080 after 0 ms: Couldn't connect to serverWe need a way to tell the host: "when you receive traffic on port 8080, forward it to 10.0.0.2:8080 inside ns0." This is called Destination NAT (DNAT) - the reverse of the MASQUERADE (Source NAT) we set up earlier.
4. Add DNAT Rules for Port Forwarding
We need two DNAT rules because traffic takes different paths through iptables depending on where it originates:
# For external traffic (from other machines) - enters via PREROUTING chain
iptables -t nat -A PREROUTING -d 192.168.64.5 -p tcp --dport 8080 -j DNAT --to-destination 10.0.0.2:8080

# For local traffic (from the host itself) - enters via OUTPUT chain
iptables -t nat -A OUTPUT -d 192.168.64.5 -p tcp --dport 8080 -j DNAT --to-destination 10.0.0.2:8080Why two rules? When an external client sends a packet to our host, it passes through the PREROUTING chain. But when we curl from the host itself, the packet is locally generated and goes through the OUTPUT chain instead - completely bypassing PREROUTING. We need both to cover all cases.
5. Verify: Access the Container Service via Host IP
curl 192.168.64.5:8080

# <!DOCTYPE HTML>
# <html lang="en">
# <head>
#   <meta charset="utf-8">
#   <title>Directory listing for /</title>
# ...It works! External clients can now reach our containerized web server by connecting to the host's IP on port 8080. The host transparently rewrites the destination, forwards the packet into the namespace via the bridge, and returns the response - the client never knows it's talking to an isolated process.
This is exactly what docker run -p 8080:80 does under the hood. When you publish a port in Docker, it creates DNAT rules in iptables to forward traffic from the host port to the container's private IP and port. No magic - just the same kernel features we've been using throughout this entire article.
Connecting the Dots: The 3 Built-in Docker Networks
If you've made it this far - congratulations, you already understand how Docker networking works! Everything Docker does is built on top of the exact same Linux primitives we've been configuring by hand. Let's map what we've done to Docker's three default network modes:
none - Total Isolation
docker run --network none alpine ip link1: lo: <LOOPBACK,UP,LOWER_UP> mtu 65536 qdisc noqueue state UNKNOWN qlen 1000
link/loopback 00:00:00:00:00:00 brd 00:00:00:00:00:00Only lo - no eth0, no routes, nothing. Exactly like a fresh namespace before any configuration.
Remember the very first step when we created ns0? A brand-new namespace with no interfaces, no routes, nothing - completely cut off from the world. That's Docker's none network. The container gets its own network namespace, but Docker doesn't configure any networking for it. Useful when you want a container with absolutely no network access.
host - No Isolation
docker run --network host alpine ip link1: lo: <LOOPBACK,UP,LOWER_UP> mtu 65536 qdisc noqueue state UNKNOWN qlen 1000
link/loopback 00:00:00:00:00:00 brd 00:00:00:00:00:00
2: enp0s1: <BROADCAST,MULTICAST,UP,LOWER_UP> mtu 1500 qdisc fq_codel state UP qlen 1000
link/ether f2:7b:12:d6:98:89 brd ff:ff:ff:ff:ff:ff
3: docker0: <NO-CARRIER,BROADCAST,MULTICAST,UP> mtu 1500 qdisc noqueue state DOWN
link/ether 62:b1:68:92:fe:3a brd ff:ff:ff:ff:ff:ff
17: br0: <BROADCAST,MULTICAST,UP,LOWER_UP> mtu 1500 qdisc noqueue state UP qlen 1000
link/ether 6a:2d:29:7d:07:a7 brd ff:ff:ff:ff:ff:ff
19: veth0@if18: <BROADCAST,MULTICAST,UP,LOWER_UP,M-DOWN> mtu 1500 qdisc noqueue master br0 state UP qlen 1000
link/ether 4e:37:8c:54:cb:fc brd ff:ff:ff:ff:ff:ff
21: veth1@if20: <BROADCAST,MULTICAST,UP,LOWER_UP,M-DOWN> mtu 1500 qdisc noqueue master br0 state UP qlen 1000
link/ether be:f7:d4:7d:90:ca brd ff:ff:ff:ff:ff:ffThe container sees everything - enp0s1, docker0, br0, even our manually created veth pairs. It's sharing the host's entire network stack.
This is the opposite extreme. The container skips creating a network namespace entirely and shares the host's root network namespace directly. No bridge, no veth pairs, no NAT - the container's processes bind directly to the host's network interfaces. It's fast (zero network overhead), but there's no isolation: port conflicts between containers become your problem.
bridge - The Default (What We Built!)
docker run -p 8080:80 nginxThis is Docker's default network mode, and it's exactly what we've been building step by step throughout this entire article:
- Create a network namespace for the container → we did this with
ip netns add - Create a veth pair and attach one end to the namespace, the other to a bridge → we did this with
ip link addandip link set master br0 - Assign an IP address inside the namespace → we did this with
ip addr add - Set the bridge as default gateway → we did this with
ip route add default - Enable outbound internet via MASQUERADE → we did this with
iptables -t nat POSTROUTING - Expose ports via DNAT → we did this with
iptables -t nat PREROUTING
Docker simply automates all of these steps. When you run docker run, the Docker daemon (and its libnetwork library) executes the exact same sequence of ip and iptables commands behind the scenes. The bridge you see as docker0 on any Docker host is functionally identical to the br0 we created manually.
What's Next?
That's everything for Part 1. Hope you enjoyed this deep dive, we built a full container network from scratch using nothing but Linux primitives.
In Part 2, we'll move up one layer into Kubernetes networking and CNI, still low-level, but now solving the much harder problem of containers talking across nodes.